
Photographing small subjects opens up a world of opportunity for nature photographers. By seeking out nature’s details, a photographer can explore a world of plants, patterns, textures, and abstract subjects that are often overlooked or seen in a less interesting way by the human eye. In this article, we will discuss one way of photographing small scenes: using shallow depth of field to render only a small part of your subject in focus. This article focuses on plants and leaves but you can use these lessons on any small subject you encounter in nature.
Use Shallow Depth of Field to Simplify and Create Abstractions
For many landscape photographers, embracing shallow depth of field and the out of focus elements that come with it can be a major shift in mentality. When photographing small subjects like plants or flowers, shallow depth of field can often transform a subject from the literal to the abstract. Generally, using greater depth of field renders a subject more literally with all of its details more obvious to the viewer. Shallow depth of field, on the other hand, often lends a more simple, dreamy, and abstract quality to a photo. Instead of photographing petals or stems or leaves, you are photographing lines and shapes. Additionally, the abstract renditions that can emerge make shallow depth of field an excellent simplifying technique when photographing a chaotic subject.
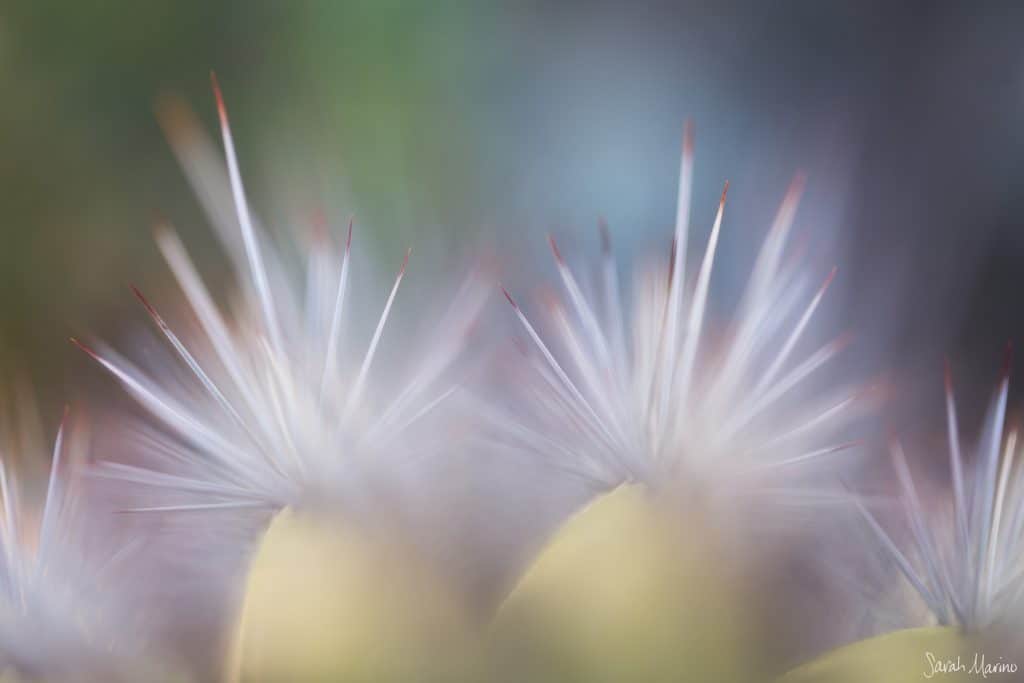
The subject of the photo below is an organ pipe cactus. I leaned in very close to a curving branch and selected a set of healthy cactus thorns, focusing on one very small section of the overall plant. By using shallow depth of field (here, an aperture of f/2.8), I was able to significantly soften the feel of the thorns and capture a more gentle portrait of this beautiful plant. The background, more of the cactus in soft even light, is far behind my subject which helps render the background nicely out of focus.

The Technical Basics of Using Shallow Depth of Field
A wide aperture, like f/2.8 or f/4, helps pleasantly blur some of the details and leave just a slice of your subject in focus. This is the key to achieving the look of most of the photos you see in this article. In most cases, I set my camera to aperture priority, set the aperture for f/2.8 or f/4, and then get to work. If the background is far behind your subject, you can also use apertures closer to f/8 and still achieve the look associated with shallow depth of field while getting more of your subject in focus – for example, the aspen leaves below. Since each situation is different, it can be helpful to experiment with different apertures to see which option you like best given the specific qualities of your subject and background.
For this type of photography, I get quite close to the subject, often only inches away. For photos that require more precision, I set up a tripod, use manual focus, and experiment with small changes until I find the composition I like the most. This approach works best if you have a lot of room to work, are photographing a sturdy subject (like a cactus), or are working with no wind. If those conditions are not present, I hand-hold my camera, set the aperture for f/2.8 or f/4, and boost the ISO to get a faster shutter speed (at least 1/100 of a second if I am using a 100mm macro lens). I typically manually focus in this case as well, relying on my eye to determine if my intended subject is in focus (I sometimes also use a focus indicator in my viewfinder but find that I prefer to rely on my eye).

This latter approach allows me to freely move back and forth to experiment with small changes in position and focus since both of those choices can make a big difference in terms of the final result. When working with small subjects and rendering them with shallow depth of field, the tiniest changes in the focus point can entirely change the look and feel of a photo and I find it easiest to experiment without a tripod in these instances. If I need to use a tripod due to low light, I will often experiment with my camera off the tripod first to see what works best and then set up the tripod to finish the photo.
I created most of the photos in this article using a 100mm macro lens, a helpful but not essential tool. I use the Canon 100mm L f/2.8 lens but a basic macro lens or moderate telephoto lens from any manufacturer can work (the shorter the minimum focusing distance, the better; if you want to experiment with handholding your camera, a lighter lens is better). In addition to my macro lens, I have used a 24-105mm mid-range telephoto, 70-200mm f/4 telephoto lens, and a 100-400mm f/4.5-5.6 lens to create these kinds of photos. Thus, if you do not already have a macro lens, give your other lenses a try as you will likely get some good results with some practice, especially with larger plants and leaves in which a short focusing distance is not quite as important.

Experiment with Different Focus Points
When using shallow depth of field, it is essential to experiment with varying focus points as doing so can have a big impact on the final result. Instead of trying to decide what I like best while out photographing, I take a lot of photos of the same subject using a lot of different focus points and different perspectives so I can decide which approach worked best after I get home and can see the photos at a larger size.
We can consider the example photos of the hedgehog cactus above. The two photos are of the same cactus but the focus point and direction makes a big difference in the final result. For the photo on the left, I focused on the cactus points, leaving the flowers out of focus. The flowers add a pop of color but are rendered as abstract forms. In the photo on the right, I moved to a different angle on the plant and focused on the flower blooms. Although the photo still has a bit of an abstract feel, it is a much more literal interpretation of this plant.
I photographed this subject in a few different ways and with different focus points – the cactus points in the very front, the cactus points in the very back, the cactus points at various places in between, with the flowers in focus, with the flowers out of focus, and with the focus point on the cactus plant rather than the tines or flowers. This kind of experimentation is typical when I photograph plants in this way, as I never know which renditions will look the best when I first choose my subject. This approach, especially when hand-holding my camera, produces a lot of failures but the failures are necessary to get to the successes.

Be Aware of Your Background
When using shallow depth of field, another important consideration is your background. With a wide open aperture like f/2.8, only a small slice of your scene will be in focus. If other elements of your scene are just beyond the focus point, they will be out of focus but still recognizable and sometimes distracting. If the background elements are at a greater distance behind your subject, they will be rendered in an often more pleasing way – a soft, more even set of abstract shapes that do not distract from your main subject. In some cases, it can be helpful to a composition to have some elements still be recognizable but slightly out of focus. Take the example of the birch branches above. The slightly out of focus branches create echoes of the in-focus subject.
Finding subjects with attractive backgrounds is a major challenge of working in nature, as it is difficult to control the scene. Despite these issues, I always work to find a solution based on what is present and never default to using an artificial background of any kind. Often, a single glance through your viewfinder will let you know if it will be worthwhile to spend more time working this kind of scene, given the background options. Below, you can see some examples of where I should have been more careful about my background, with a crack in a sidewalk, a barbed wire fence, and a bright sunlight background interfering with my subjects. In each of the three examples above, I could have moved my position and eliminated these visual distractions pretty easily.

Consider Lighting of Your Subject & Background
In addition to the subjects in your background, it is important to be aware of the lighting situation for the whole scene you are photographing – not just your primary subject. If your subject is evenly lit but the background is in bright sunlight, you will often get bright, distracting highlights in your background. While this effect can sometimes work, it often pays off to change your position or make your own shade to help create more even lighting. I carry around a portable diffuser to help with these situations, although a coat or backpack can work in a pinch. When using shallow depth of field, I often prefer heavily out of focus background elements with few details under soft even light, as this helps the main subject stand out and is often more visually pleasing.

While most of the photos in this post were taken under even lighting, other types of light can create interesting opportunities for photographing very small scenes. Photographing with the sun behind your subject, for example, can make translucent leaves or fuzzy edges of a plant seem to glow. Sidelighting can create strong shadows, offering another element to integrate into a composition. I took the photo above on a day with bright sun (I brightened the shadows in processing to soften the look). These different kinds of lighting can create additional contrast and stronger lines, both of which can help create more dynamic and striking compositions. Working with these alternative lighting scenarios takes a lot of experimentation, persistence, and perfecting your technique before things come together so be prepared to try again if your first attempt does not work out as you might have hoped.

Improving Your Composition When Using Shallow Depth of Field
Composition is the arrangement and flow of elements within a frame. In addition to light and subject selection, composition helps tell a story through a photograph. As the photographer, you are in control of what to include or exclude within your frame. For this kind of photography, your subjects will be small and thus, small details (and imperfections) carry a lot of visual weight and impact the success of your final result (for example, specs of dirt, a blemish on a leaf, or messy spiderweb can reduce the impact of a photo). Taking the time to carefully craft and then refine your composition in the field can help minimize negative surprises after you get home and look at your tiny subjects on a full-size monitor.
In nature photography, composition is often discussed in terms of a set of rules (like the rule of thirds). I personally stay away from such rigid guidelines and instead think of composition concepts as tools in a toolbox that can be applied in many different ways. In some cases, it makes sense to place a major element of a scene a third of the way into your frame (the in-focus birch leaves above). In other cases, it makes more sense to center your subject (the radiating yucca below). Thus, I encourage you to instead approach composition as a process of making deliberate choices about how to use your set of composition tools based on the needs of your scene and the story you hope to tell about your subject.

Composition concepts, like those discussed below, serve as building blocks to help you pull together elements of nature into a photograph once you start working with your camera. Another benefit of learning these concepts is that they also help improve your ability to identify opportunities in the field by honing your ability to see subjects in different ways. The ideas discussed below will help you distill what you see, start to identify subjects, come up with some initial composition concepts, and then refine the final result. Here are a few composition ideas to keep in mind when photographing plants:
- What do you want to communicate about your subject? If you want to convey boldness, seek out more aggressive compositions with strong lines, forceful angles, a lot vigorous implied movement, or defined shapes. Want to convey elegance? Look for curves, flowing lines, and softer edges.
- Learn to see abstractions: Do not just look for literal plants to photograph. Instead, spend time looking for lines, curves, shapes, repetition, layers, colors, spacing, flow, balance, symmetry, and lighting. Once you see these kinds of abstractions, they can serve as building blocks for your compositions.
- Study your subject’s direction and flow: Most subjects in nature have an obvious direction or directions. Identifying these qualities and then determining how they impact the flow of a composition can help as you arrange elements within your frame.
- Get closer to your subject and fill the frame: Moving in toward your subject can help eliminate distractions, isolate your subject for a better composition, and emphasize the abstract elements. Specifically, filling your frame means that your subject (or a consistent background) continues beyond the borders of your photograph in all directions.
- Watch your edges and seek to eliminate distractions across your frame: Light spots, dark spots, intrusions, or opposites on the edge of your frame can create major visual distractions, even if they are tiny. Look for these same issues across your frame and try to address them by refining your composition in the field.

Finally, I always consider visual weight when I am composing a subject and working with shallow depth of field. I think of visual weight as the amount of attention an element attracts compared to the other elements within a frame. Visual weight does not necessarily correspond to the physical space taken up by a subject, although larger subjects often to have significant visual weight. In some cases, a tiny object can catch a viewer’s eye and thus command a lot of visual weight relative to its size. Take the example of the photo above. The dark purple spot in the upper right corner is darker than the subjects in the rest of the frame. It catches my eye a bit so I lightened it during processing to reduce its visual weight and ability to distract from the rest of the photo.
Thinking about the visual weight of the objects in your frame can help you create a unified and cohesive composition. Because this approach to photography deals with such small scenes, tiny elements – like a bare patch of ground or a bright spot in the background – can carry significant visual weight and distract from the overall success of your photograph. Therefore, it is important to step back as you are creating a composition and think through how much visual weight the different elements in your scene hold and how they together affect things like your intended focal point(s), balance, flow, and continuity. If you find that something in your frame is carrying too much or too little visual weight relative to your goals for the scene, you can use this information to make adjustments to improve your composition (or know that you have something to address in processing).

Fine-Tune & Optimize with Photo Processing
The degree to which a photographer should process their photos is one of the great debates in the nature photography community, so I offer my practices here as a reflection of what I do, not what is the “right” or “best” approach. For my photographs of small scenes, I generally want my photos to stay grounded in the reality of what I saw through my camera when I took the photo. This means that I do not engage in significant cloning or clean-up but will address imperfections if they make up a small portion of the frame or do not significantly alter the subject. On the other hand, this kind of photography offers a departure from the reality of what we see with our eyes, so I feel some freedom to creatively process such photographs.
I see photo processing as a way to optimize my composition and subject after I get home. In the example above, the composition depends on the centered cactus, the radiating thorns, and symmetry. Because nature is never perfect, the left side of the frame ended up quite a bit darker than the right side. So, my processing focused on brightening up the left side of the frame and eliminating some of the distracting colors in the background – a common challenge when photographing plants in nature using shallow depth of field. To address these issues, I frequently use a technique called color painting, which adds a very soft overlay of color to an area of a photograph (in Photoshop, this starts with adding a new layer, selecting the ‘Color’ blending mode for that layer, using the eyedropper to select the color you want to paint from within the photo, reducing a soft brush’s opacity to 3-5%, and then gently painting over the distraction or problem area to ever so slightly soften a color or make it more consistent with the rest of the frame).
Cloning out minor distractions, contrast adjustments (both increases and decreases), color adjustments, and softening out-of-focus elements round out my typical processing choices for the photos you see in this post. Since I generally want my photos of plants to have a soft, elegant feel, I keep my processing mild in terms of contrast and color adjustments so that the grace, elegance, and softness of the subjects can shine through.

Implementing These Ideas
Next time you are out photographing, spend some time applying each of these concepts to help expand your photography toolbox. Start by slowing down and going through a visual inventory of what you see in front of you. Strive to notice the small details that make up the slice of the world you are viewing. After you notice the literal subjects that make up the scene, start looking for abstractions and think about ways you could use those abstractions to craft a composition. Once you have a scene in mind, pay attention to the details and be deliberate in your decisions about what to include and what to exclude. Spend some time moving slowly with your tripod and being more free-form by handholding your camera, working with different apertures to learn from your results. Experiment by trying new techniques to help stretch your creativity.
If you use shallow depth of field in your photography and have lessons that could benefit other NPN members, please share your ideas in the comments below.