
Some photographers enjoy shooting the grand landscape in dramatic weather and golden hour light. Social media websites are dominated by grand landscapes that contain glorious sunsets, rainbows, lightning, and the Milky Way. It’s easy for photographers to be seduced by the power of such dramatic moments. These images can have a high immediate wow factor, but their impact on the viewer can be short-lived. When an image depends primarily on these shock and awe elements, it is harder to create images with lasting substance and a deeper meaning.
But when you add fog or mist to the landscape, you have an opportunity to create dreamy, ethereal looking images. The softer and quieter mood of foggy landscapes engages viewers more on an emotional level, rather than through shock and awe. I love photographing in fog and mist because it can lead to creating evocative images with wonderful atmosphere. For me, nothing compares to photographing in fog because it adds a sense of mystery and an otherworldly aspect to the landscape. I enjoy shooting in fog so much that I have devoted an entire gallery on my portfolio website to just foggy landscapes.
Fog can be a wonderful gift to the photographer, adding a moody ambiance to almost any scene. Fog has the ability to take the most ordinary and mundane locations and transform them into magical places. Not everyone is fortunate enough to photograph lightning storms above the Grand Canyon, or an amazing sunrise at Oxbow Bend in Grand Teton. But add fog and mist to the local woods and ponds near your home, and you can come away with mysterious, moody images. These dreamy, magical shots of everyday places can result in images that have more substance and a longer-lasting impact on the viewer.
Fog affects the viewer’s sense of perspective and makes everything in the scene feel more intimate. The diffuse nature of fog is also great for simplification; it can reduce complexity in the scene and eliminate distractions in the background. This allows photographers to work with the sense of depth in an image in ways that otherwise wouldn’t be possible. It can lead to creating wonderfully minimalist images, where the photographer can emphasize only a limited number of key elements.
Landscapes shot in fog often have a dreamy, almost painterly look. The diffuse nature of fog softens the light, which can create a gentle feeling in the image. But the effect that fog has on images can also generate a wide variety of moods, ranging from calm, to gloomy, to mysterious. The ability of fog to reveal or conceal parts of the landscape gives the photographer more creative choices. It allows you to decide which elements in the scene are revealed to the viewer, and which are hidden. This makes the viewer wonder what unseen things are hidden by the fog, which is an essential part of fog’s mystery. And it also helps create the illusion that the scene extends far beyond the edges of the image. Whenever you can engage the viewer’s imagination like this, you end up with more successful images.
And on a personal level, I simply enjoy being out in the landscape during foggy weather. I like the crisp feeling of being in cool, moist air, and find it invigorating. There is a quiet stillness to the landscape during foggy conditions because fog dampens sounds. This stillness helps me concentrate, and I can better connect with the landscape and focus on image-making. For me, fog creates an intimacy with the landscape that makes photography more enjoyable. There is also a sense of mystery about what parts of the landscape will be concealed or revealed by the fog. This opens up many creative possibilities and gets me excited about producing images with more impact.

Fog consists of water droplets suspended in the air, which essentially creates low lying clouds. Mist is a less dense version of fog. Fog forms when water vapor (water in its gaseous form) condenses to a liquid. During condensation, small water droplets are created that hang in the air, and we see this as fog. Fog occurs when the difference between the air temperature and the dew point (the temperature at which air condenses into water) are within a few degrees of each other. So to predict the occurrence of fog, pay attention to weather forecasts, and look for conditions where the temperature and dew point approach each other.
Timing and location are the keys to finding fog. The appearance of fog and mist are related to weather, season, and location. You will often find fog over bodies of water, such as at the seacoast, or in low-lying areas, like river valleys. Fog and mist are most likely to form overnight and are best found early in the morning since they evaporate after the sun warms the air. We also see fog more frequently in the fall and spring. These seasons typically have warm days followed by cool nights, which are the prime conditions for creating fog.

Radiation Fog: This type of fog is found on mornings after cool, clear, windless nights when the ground loses heat via radiation. It is also common on humid mornings after overnight rain. This is the kind of fog typically found on autumn mornings.
Advection Fog: This occurs when warm, moist air moves over a colder surface. It’s common at seaside locations where the land is cooler than the water. It also occurs when a warm air front passes over snow on the ground. Fog along the seacoast can come and go, with beautiful breaks of light in between, which creates exciting opportunities for photographers.
Ice Fog: Fog in winter, called freezing fog, can add a significant impact to your photographs. Freezing fog leads to the formation of Rime Ice, where ice crystals cling to surfaces. This can create lacy, delicate patterns, and textures when it forms on trees.
Steam Fog: This fog is created by geysers and hot springs and is found in the thermal areas at Yellowstone. It is also the type of fog called Sea Smoke, which occurs when frigid (below zero) air moves over warmer bodies of water, such as the ocean.
I live in New England, a place where fog is relatively common. I have been fortunate enough to photograph all of these types of fog, and they each have their unique appeal for photographers. My favorite kind of fog is radiation fog, which has helped enhance many of my autumn in New England images.
In essence, fog acts as a natural softbox: water droplets scatter the light so that it originates from a broader area, versus the directional light coming from a point source such as the sun. The soft, diffuse light from fog is a two-edged sword; it can have both beneficial and detrimental impacts on our images. The soft light associated with fog creates the dreamy, ethereal look that many photographer seek. But fog can also result in reduced contrast and color saturation, which can sometimes lead to flat, dull-looking images.
The other technical issue is exposure. The whiteness of fog (like snow) can trick the camera’s meter into underexposing the scene. The fog will become a dull gray and lose its appeal. When using auto-exposure, you can overcome this by using some plus exposure compensation, which restores vitality to foggy scenes. Adding plus one-stop is usually a good starting point, but be sure to check your histogram to avoid blowing out the highlights.

As objects become farther away from you, they not only become smaller, they also lose some contrast. Fog exaggerates this lower contrast and creates a flattened sense of perspective. As mentioned earlier, this can have the beneficial result of reduced complexity and elimination of background distractions. However, photographers also need to be very careful about the sense of depth in fog images, which can be adversely affected by this flattened perspective.
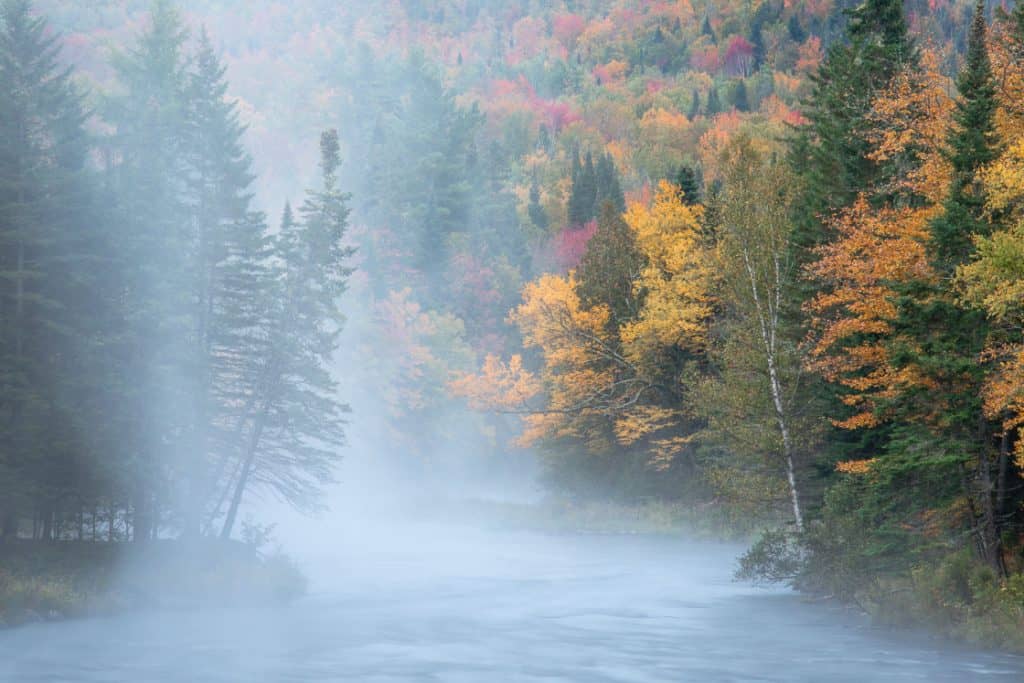
With foggy scenes, maintaining a sense of depth is critical. It is often helpful to have at least some elements of the scene be close to the camera, and outside of the densest part of the fog. This way, part of your image can retain higher contrast and color saturation, and it will look nice against the softer, more diffuse background. This is an analogous situation to photographing forests, where it is often hard to get good images from inside the forest interior itself. It is usually better to step outside the trees and shoot from the edge of the forest. This way, the scene has a better sense of scale, and trees inside the forest do not clutter the composition.
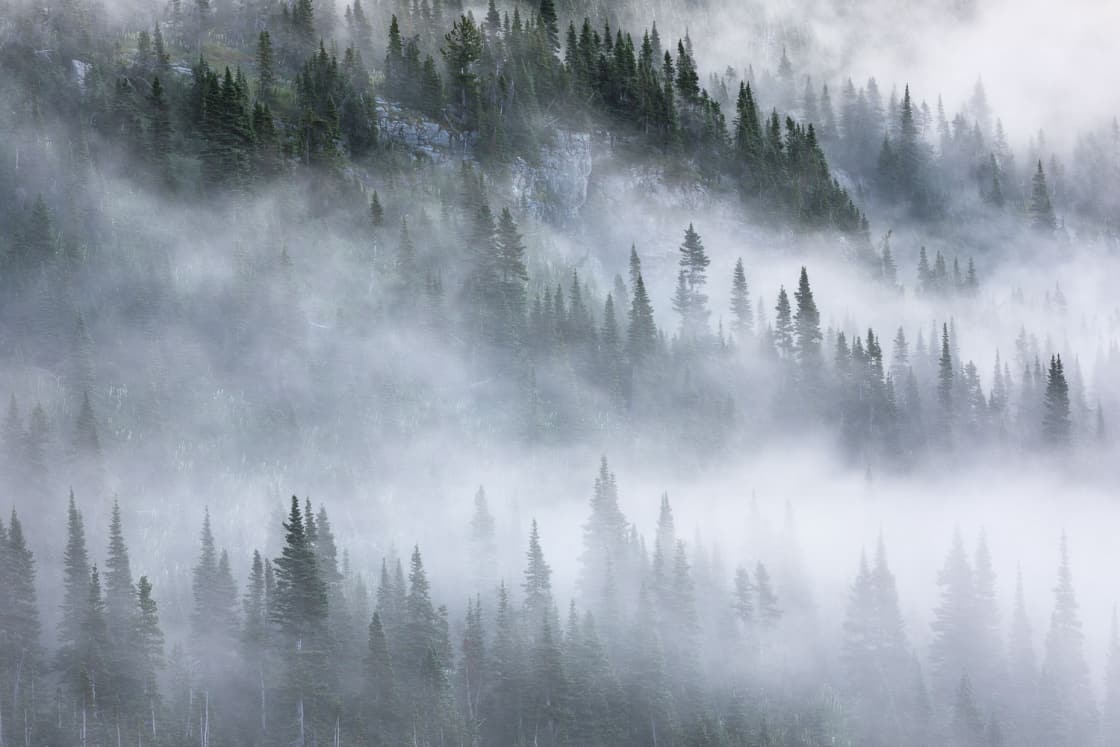
This same approach can be beneficial with foggy scenes. By stepping outside the denser part of the fog, some elements will retain more contrast and saturation, as compared to the softer and more diffused background. The resulting juxtaposition goes a long way towards maintaining a sense of depth within the image. The contrast differential will also help emphasize the moodiness of the fog in the background. Fog is all about mystery, so if you only see some things peeking out of the fog, while the rest is hidden, the sense of mystery is increased. It also helps to maintain a sense of depth if you can create compositions with distinct layers within the scene. This approach keeps some elements outside the fog’s densest part and leaves other things partially or fully hidden by the fog as they recede into the background. Using layers in a composition like this is a great way to help maintain a sense of depth within foggy scenes.
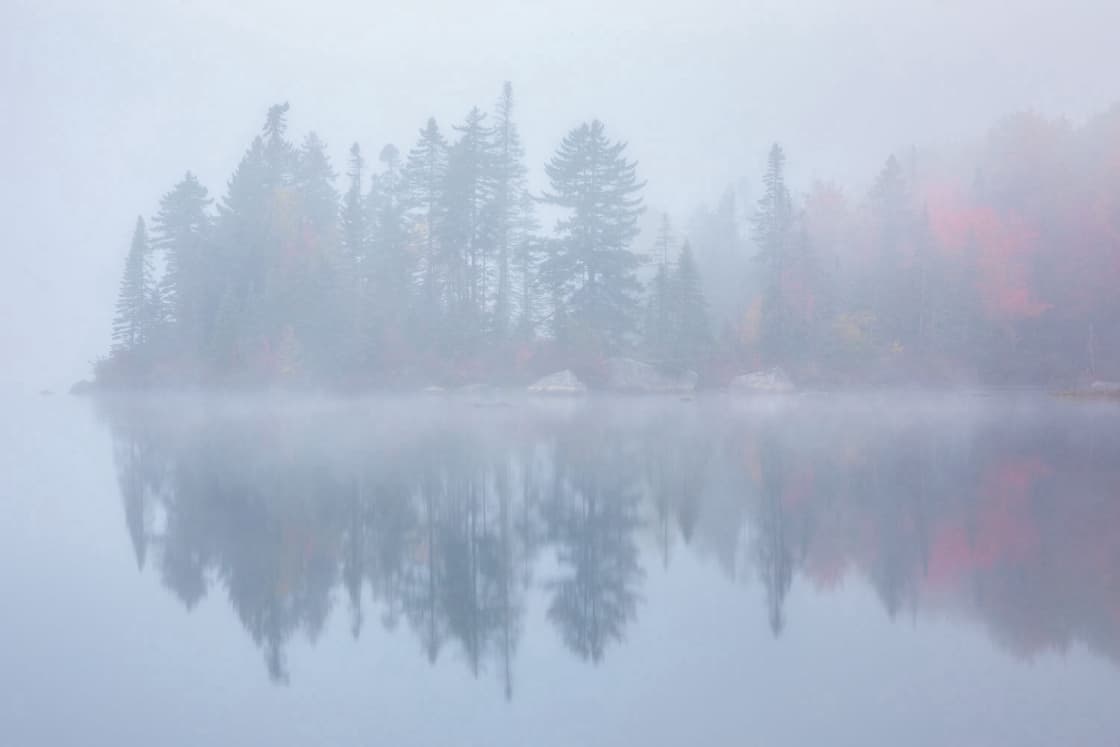
If you are shooting from inside the fog, you can let the fog take center stage in the image and use it as a means of abstraction. A great way to do this is by isolating shapes or silhouettes against the fog, which brings a very haunting and mysterious feeling to an image. This is also an excellent approach to use when you don’t have anything in the near foreground to create a sense of depth. Using fog to isolate a subject is also a great way to make effective use of negative space in a composition, which helps define the subject’s shape. Things such as trees isolated against a background of fog can make for very graphic subjects. This allows the photographer to play with shape and form to create visual interest in the image. This is where the simplification benefits of fog come into play.
Also, be sure to pay attention to the density of the fog. If it’s a thick fog, then concentrate on isolating shapes to carry the image. But if the fog is starting to break up, instead, concentrate on the light in the scene, which can be quite spectacular. For example, sunlight filtering through fog in a forest can create light rays streaking through the fog and trees. To make the light rays look their best, compose the scene so that the sun is not included in the image; otherwise, the sun’s brightness will overwhelm them. In this type of dappled light, there will also be shadows in the forest that can accentuate the light rays as well. Light rays are not only beautiful, but they can also be used as leading lines to help direct the viewer’s eye throughout your composition.
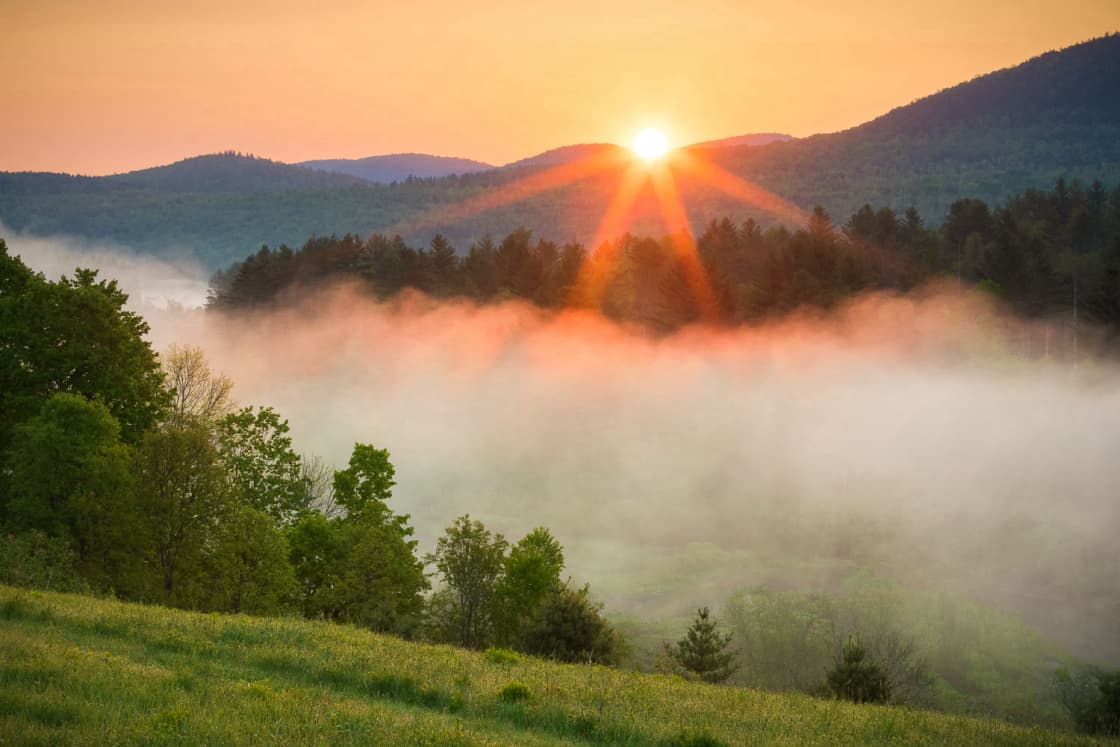
Another great time to take advantage of fog and mist is when you can photograph backlit scenes as the sun begins to burn through the fog. The use of backlighting can create a beautiful warm glow in the fog. This usually works best with the low, golden hour light at sunrise. This works well whether you are shooting from inside the fog or above the fog, such as from the top of a mountain above a foggy valley below. In this situation, it is okay to include the sun in the image, and you can also try for a sunstar by stopping your lens down to a high aperture such as f22.

Due to the low contrast nature of fog images, post-processing them is usually relatively straightforward. It is important to adjust exposure to keep the fog relatively brighter in tonality. This adds vitality to the fog and avoids a dull gray look. When processing fog images, I don’t add much contrast. The more contrast you add to the image, the less fog you will have, which means you will lose some of the soft, dreamy look. If the fog is dense and you have lost too much detail in the scene, you can try using the dehaze slider in Lightroom to restore some contrast. But be very sparing in the use of dehaze, or you risk losing the fog’s softness. A little dehaze goes a long way, I generally keep dehaze adjustments under +5. I usually apply it only to the areas of the image that need it. Lightroom’s adjustment brush is an easy way to apply dehaze to only certain parts of an image. On the other hand, if your fog is not dense enough for your taste, a slight amount of negative clarity or dehaze can help enhance the look of the fog.
Perhaps the most significant impact post-processing can have on your fog images is your choice of white balance. You can experiment with this to affect the mood of the image. In images where there is no direct sunlight in the scene, I generally prefer to keep the fog slightly cool, especially if I can contrast the cool fog against warmer colors. If there is direct sunlight in the scene, such as light rays through a foggy forest, I prefer to use a warmer white balance to add more ambiance.
So the next time you find yourself “Lost in a Fog,” be sure to take advantage of the wonderful benefits that fog and mist can provide to your images.