Tips & Techniques for Photographing Little Marvels
Hummingbird photography is really fun! Challenging for many reasons, but the end results are gratifying. The purpose of this article is to share information on how I go about photographing these magnificent little birds. There are many options available with varying equipment needs. I’ll start with techniques that require the least amount of equipment and work my way up to full multi-flash techniques that require more equipment.
Before we jump into the techniques, here’s a few facts about these little marvels. It is important in wildlife photography to know as much about your subject as you can.
- So Just how fast do those wings beat?
- About 50-80 beats per second
- How much do they weigh?
- They come in many sizes
- An average is around 4 grams or about .14 ounces
- A U.S. penny weighs about 2.5 grams
- Some large hummers can weigh as much as 20 grams
- How fast does their heart beat?
- About 1200 beats per minute while flying
- About 400 beats per minute perched
- At night – Torpor – a type of deep sleep where animals slow their heart rate by as much as 95% allows them to conserve energy and survive the night
- They need to drink their weight every day to survive
- The Bee Hummingbird is the smallest hummingbird
- About 2” – 2.4”, 1.5 to 2 grams
- It is only found in Cuba
- About 2” – 2.4”, 1.5 to 2 grams
- The Calliope Hummingbird is the smallest hummingbird in North America
- 2.8” – 3.9”, 2-3 grams
- The Patagonia Gigas or Giant Hummingbird is the largest known hummingbird
- About 9.1” and weighs about 18-24 grams
- An average hummingbird nest is about 1.5” – 2” in diameter
- 1 – 3 eggs at a time
- A hummingbird might lay up to 12 eggs in a lifetime
- Typical incubation times are 2 – 3 weeks
- It is important to know what hummingbird species are in your part of the world and what times of the year you’re likely to see them
- For example I live in central New Mexico where there are 4 species that are here from about April – September
- Black Chinned
- Broad Tailed
- Rufous (Usually arrive in July)
- Calliope
- For example I live in central New Mexico where there are 4 species that are here from about April – September
- They are simply amazing!
Basic Equipment Needs
- DSLR or Mirrorless Camera
- Moderate Telephoto lens or Zoom Telephoto Lens
- 300mm full frame equivalent or longer is desirable
- Tripod is helpful for some situations and required for others
- Flash
- We’ll talk more about flash later in the article, but even one shoe mounted flash can be helpful
Photographing Hummingbirds While Perched
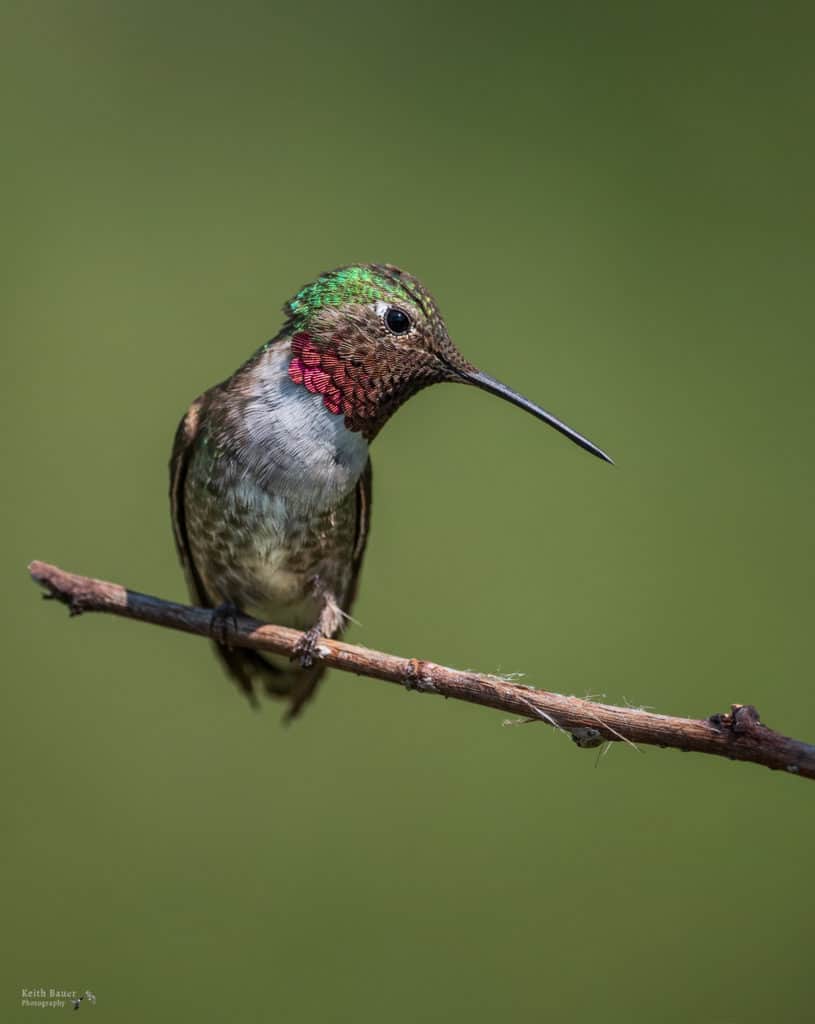
Let’s start with the option of photographing hummingbirds while they are perched. Yes, they do perch! As a matter of fact, they perch most of the day to conserve energy. As you are well aware, hummingbirds are very fast little birds. In all of the methods I’m going to describe in this article, there are a couple of key concepts. Patience…. you have to be patient to photograph them. You have to wait for them to come to you or to a predictable location, like a perch, or a feeder, or a flower, as you are not going to have any success trying to follow them and hope you’ll catch up for that instant in time to make an image.

1/2500; f/4; ISO 320; 600mm handheld
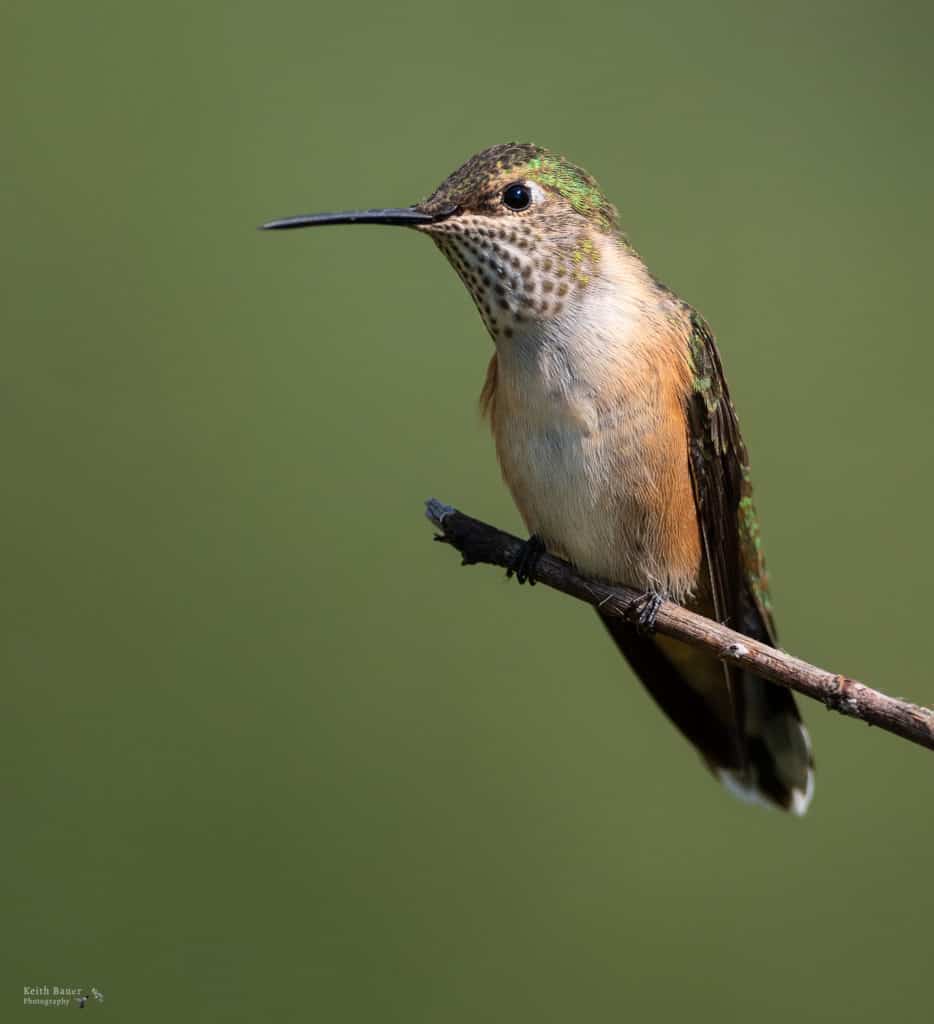
Generally the challenging part is finding a clear, unobstructed view. If you find one, watch for behavioral patterns. They may fly from the perch, but often return to the same location very quickly. This is particularly true if they are protecting or defending a feeder. Some species are notorious for their aggressive behavior protecting feeders such as the Rufous hummingbird.
Be prepared with your focus locked on the bird or close to that distance if you anticipate the hummer coming back to a specific location. Watch the background and adjust your position if possible for a more pleasing background.
1/2500; f/4; ISO 320; 600mm handheld
1/2500; f/4; ISO 320; 600mm handheld
1/640; f/6.3; ISO 400; 400mm on tripod
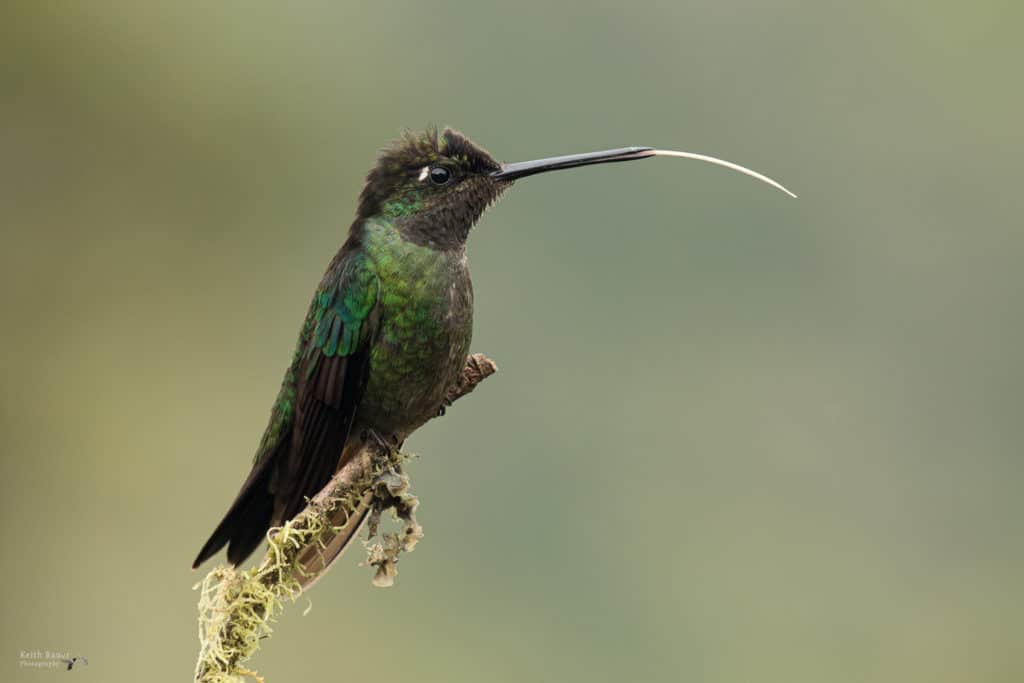
Watch for interesting behaviors. Since they drink nectar using their very long tongues, you might catch a frame with that tongue out.
1/640; f/4; ISO 800; 500mm on tripod
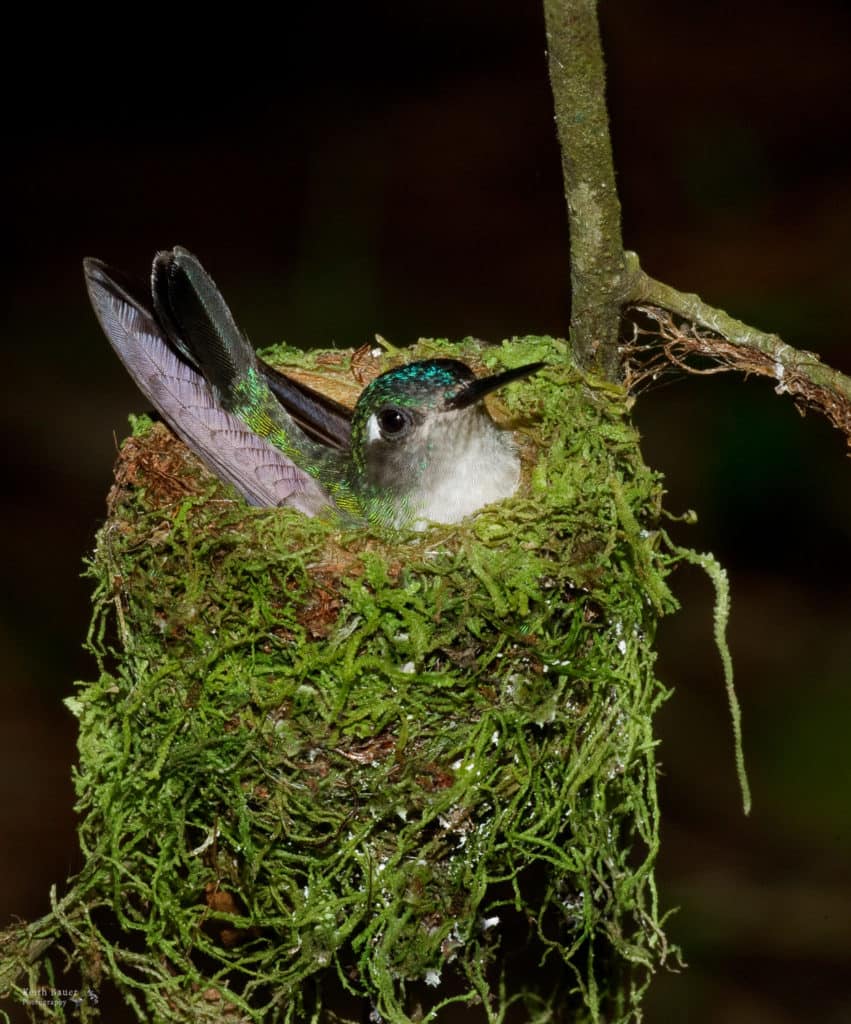
This lovely Green Crowned Brilliant perched on this banana plant, flew and returned numerous times. I set up specifically to find a darker background to help separate the hummingbird from the background.
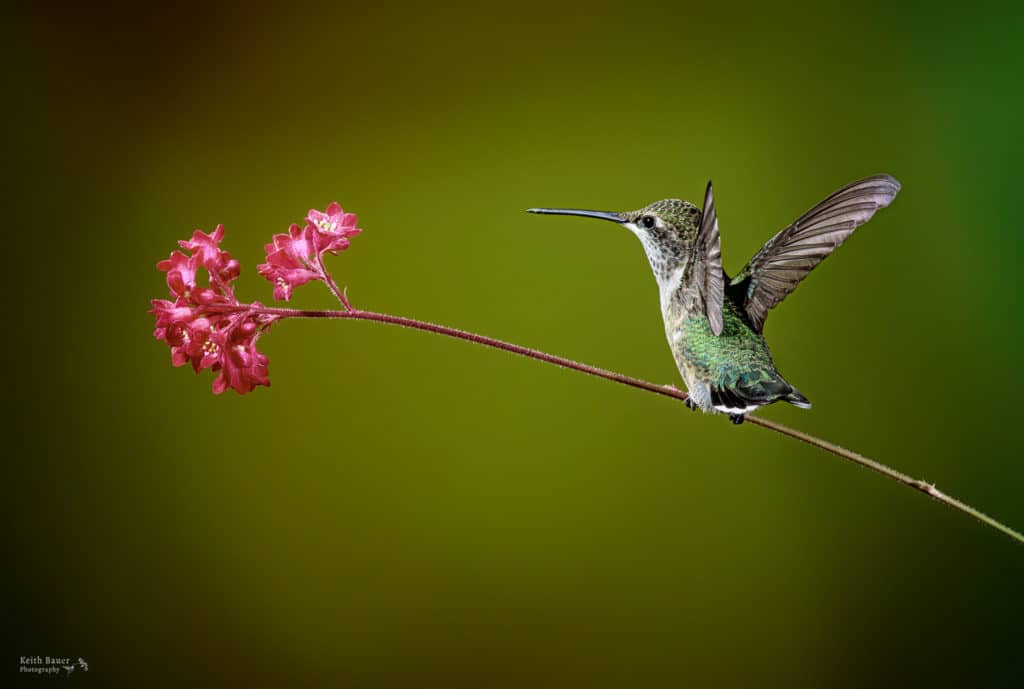
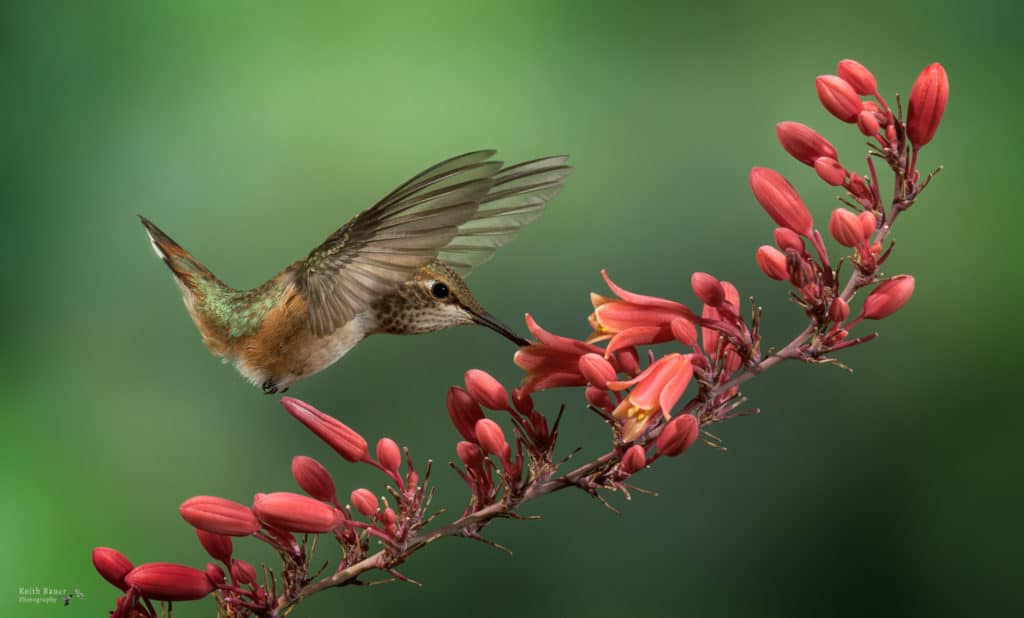
They will also land on a flower stem before heading to a nearby feeder or the flower itself. Be ready as they usually will not stay very long.
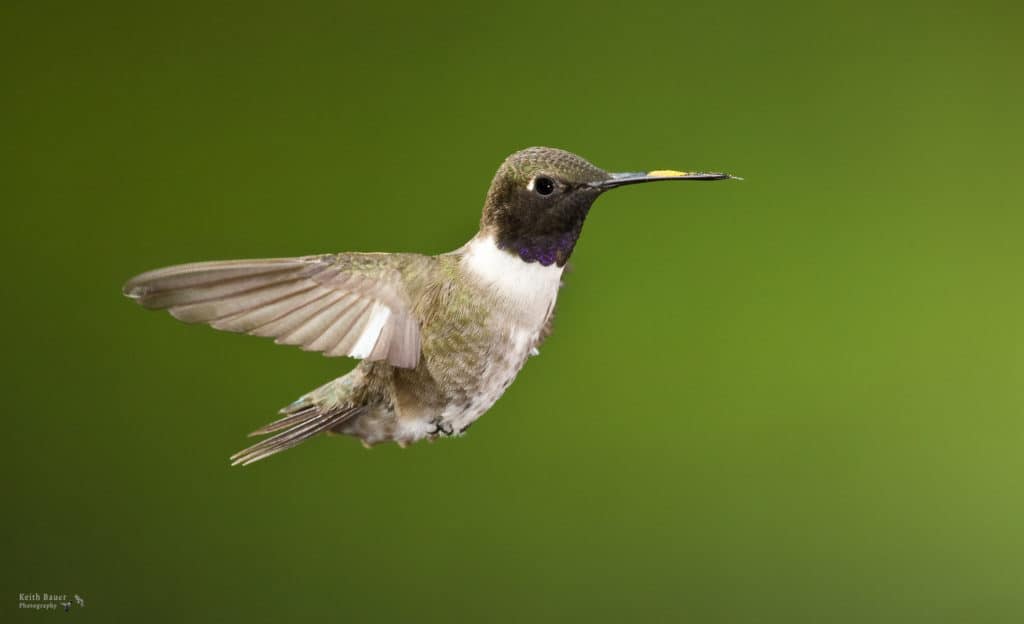
Photographing Hummingbirds Hovering
The first place to practice hovering images is at your feeder. Pay attention to their behavior. They will often come to the feeder, stick their beak in the feeder, get a quick drink, then back up, hover, and repeat. Be ready for the hover. This is a good place to add a single flash. The flash can be on camera, but for better results, take it off camera. You can do that with an off-camera shoe cord, or via wireless radio communications. Many flash systems today have built in radio communications with easy to use transmitters. We’ll talk more about off camera options in the multi-flash section later in the article.
Provide fresh food for your hummingbirds. The nectar in feeders can go bad quickly, especially in hot weather. During the hottest months here in the desert southwest, I change out the nectar in my feeders at least every other day.
Hummingbird nectar recipe:
- 1 part sugar
- 4 parts water
- NO food coloring
- Simply dissolve the sugar in the water. You can heat up the water to aid in dissolving the sugar. Let it cool before putting it in your feeders.
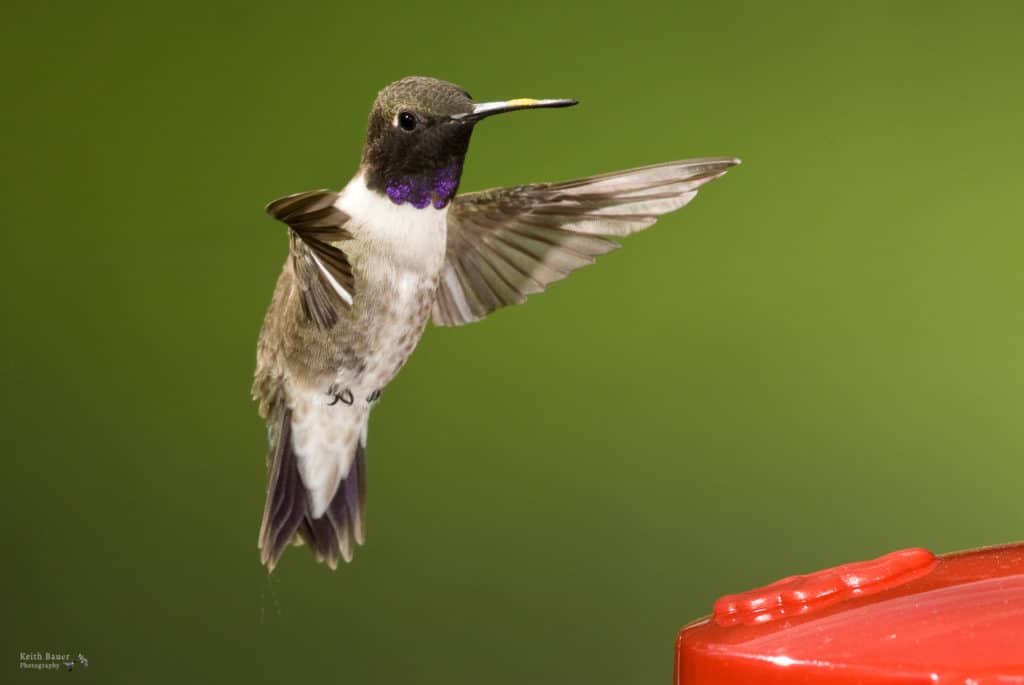
On-Camera Flash; 1/500; f/4; ISO 250
If your shutter speed is faster than your cameras normal flash sync speed, be sure you enable High Speed Sync on your flash or camera body.
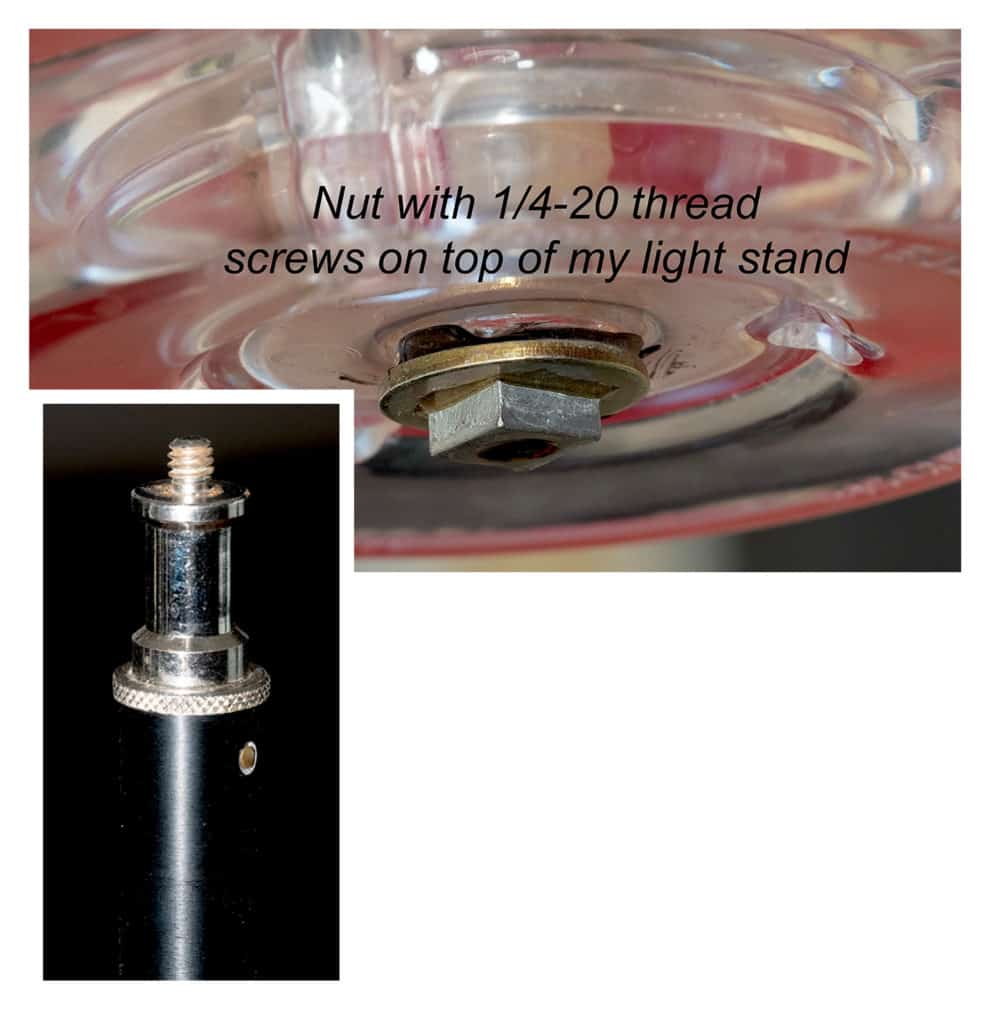
Here’s a little tip to make life easier to get better backgrounds for hovering images near your feeder. I like to place my feeder on a light stand for easy mobility for this kind of photography. I just glued a 1/4-20 nut to the bottom of my feeder so I can screw it on to the top of my light stand. This allows easy mobility with the feeder as well as easy height adjustments via the light stand.
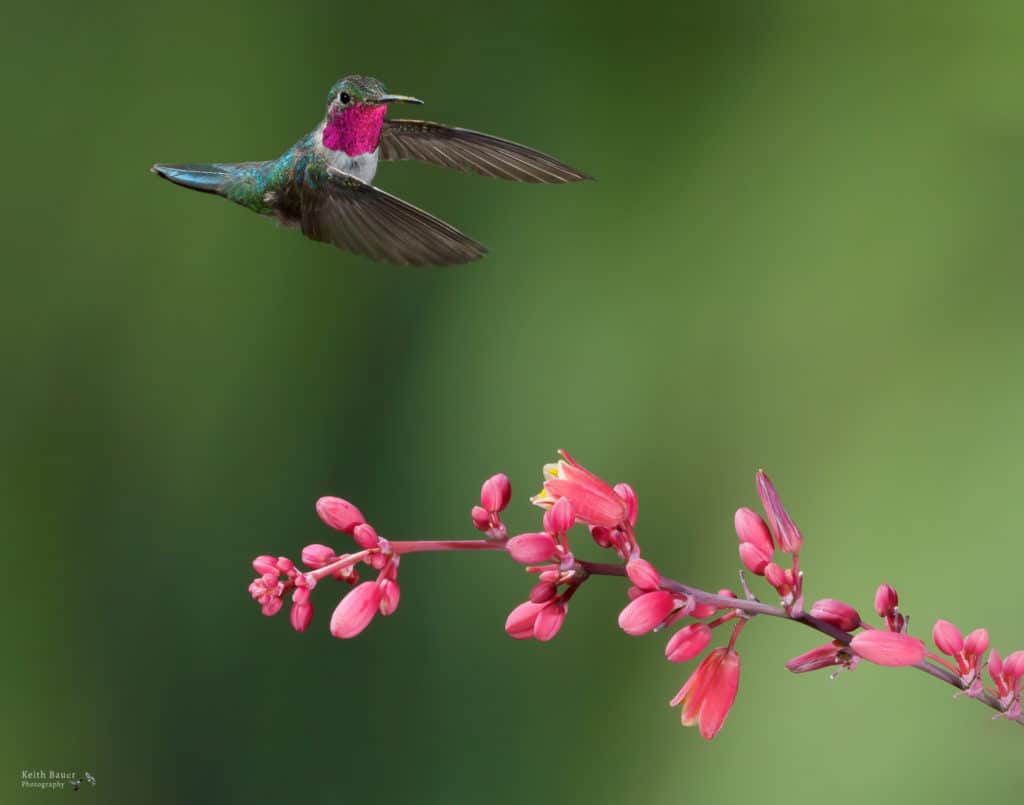
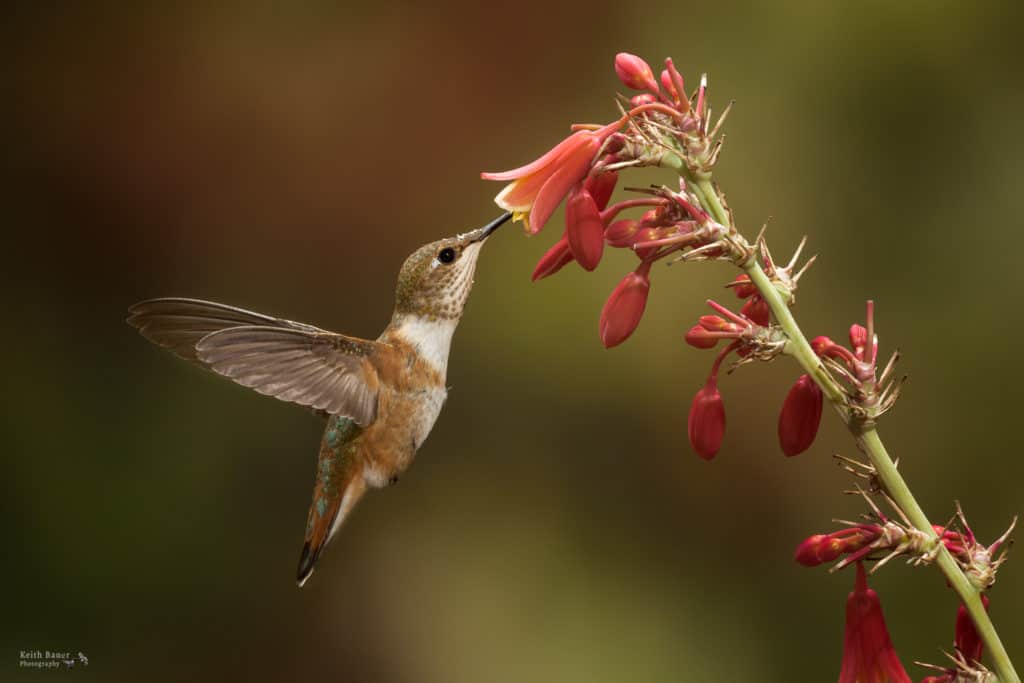
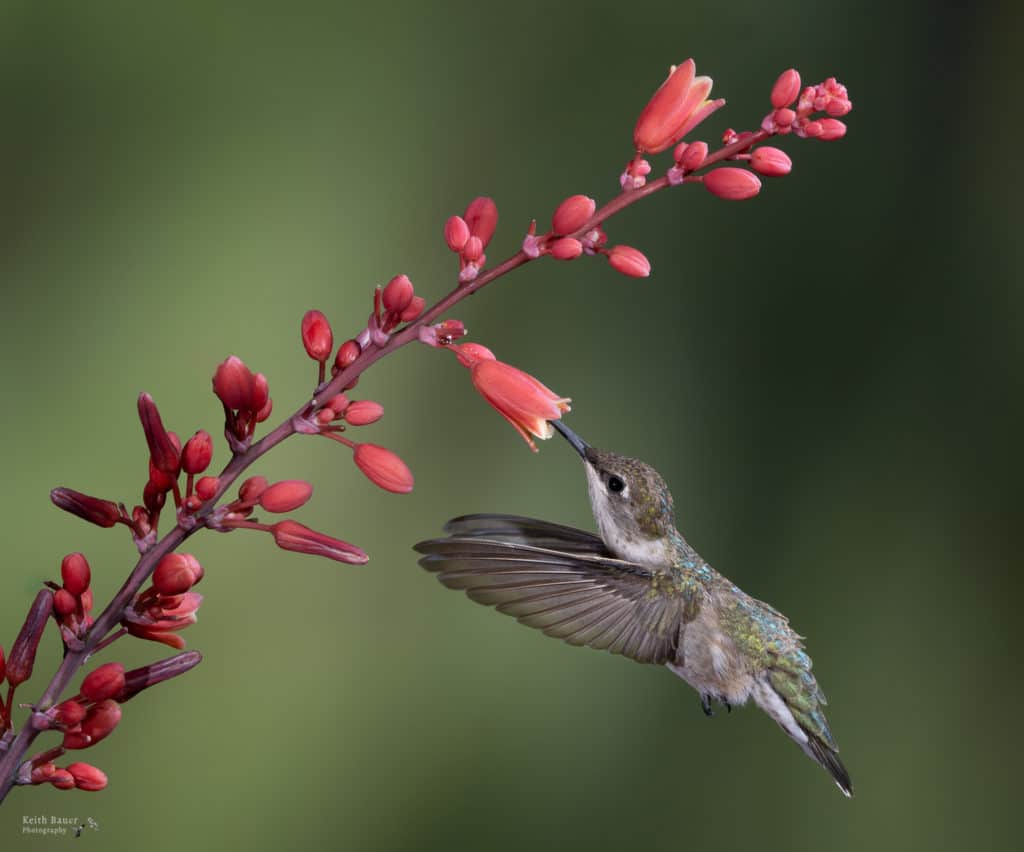
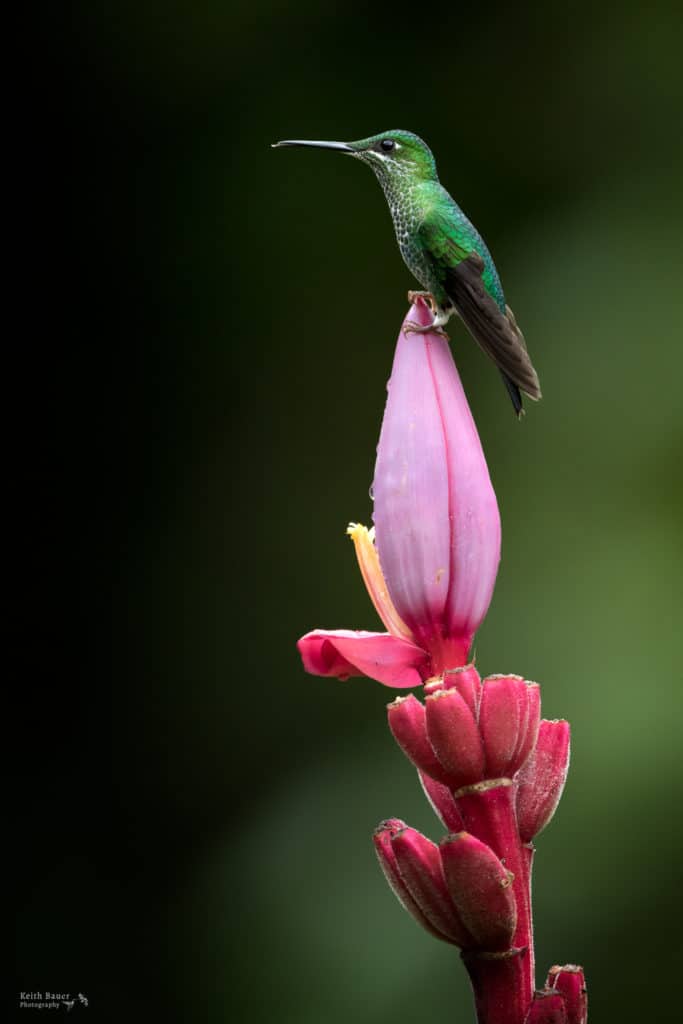
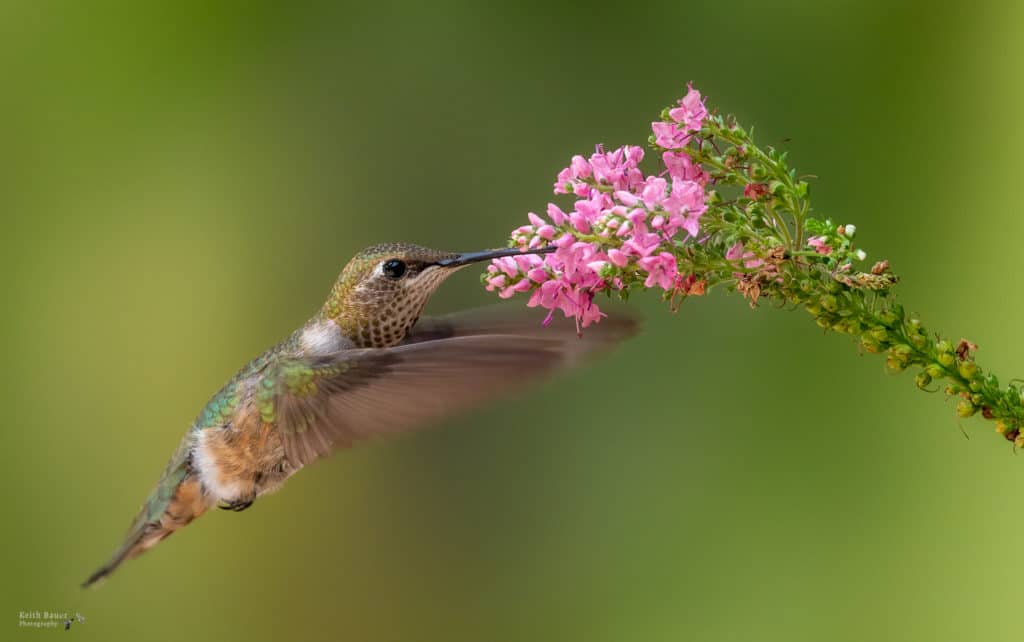
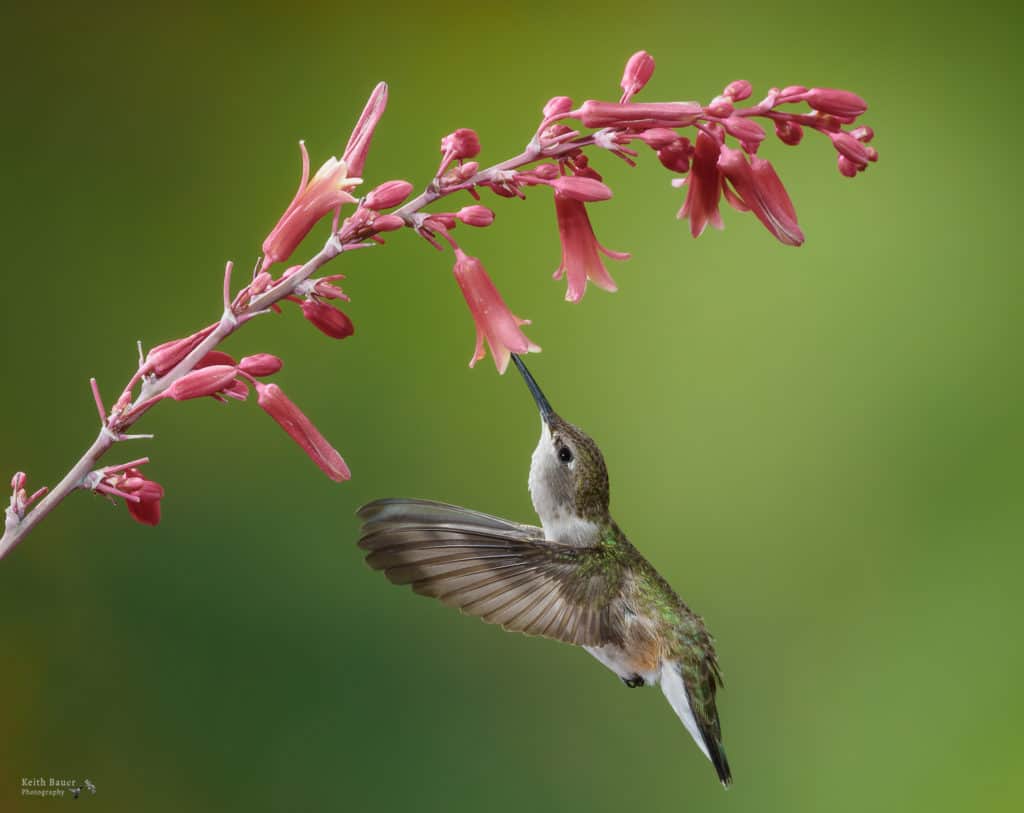
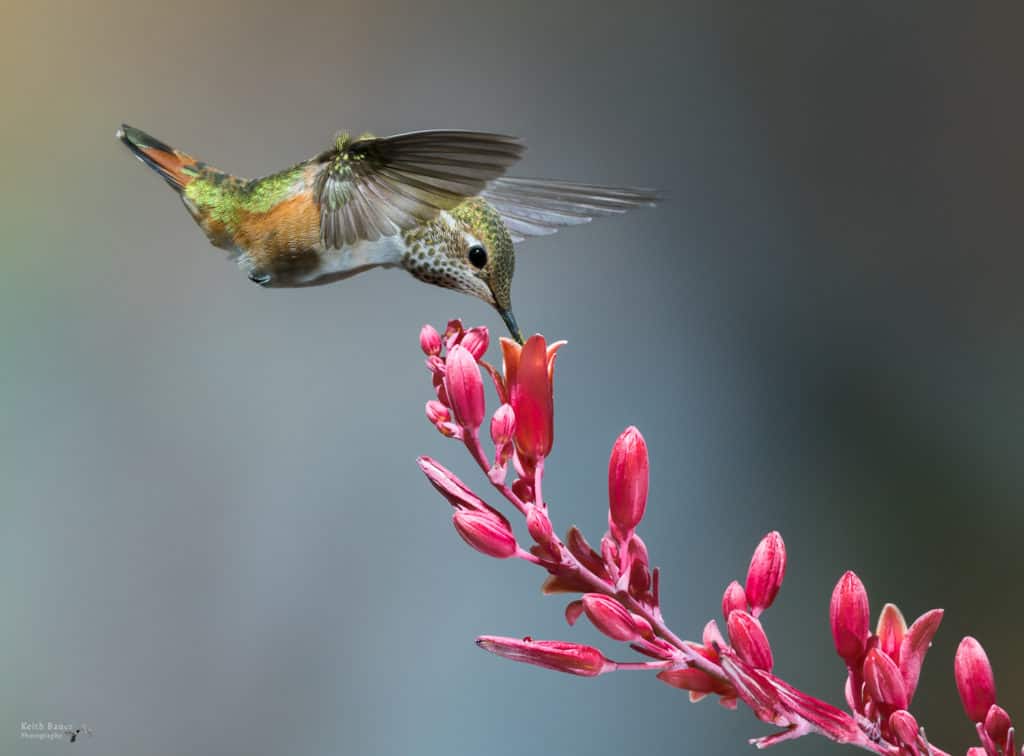
After you’re comfortable capturing them hovering near your feeder, get a nice flower with a nice background. Look for flowers that you normally see them feeding on. They are less likely to come to some random flower if it isn’t something they naturally feed on. The other issue is even if you get them to come to some random flower, the image will look odd since it just isn’t a natural source of pollen / nectar for the hummingbird.
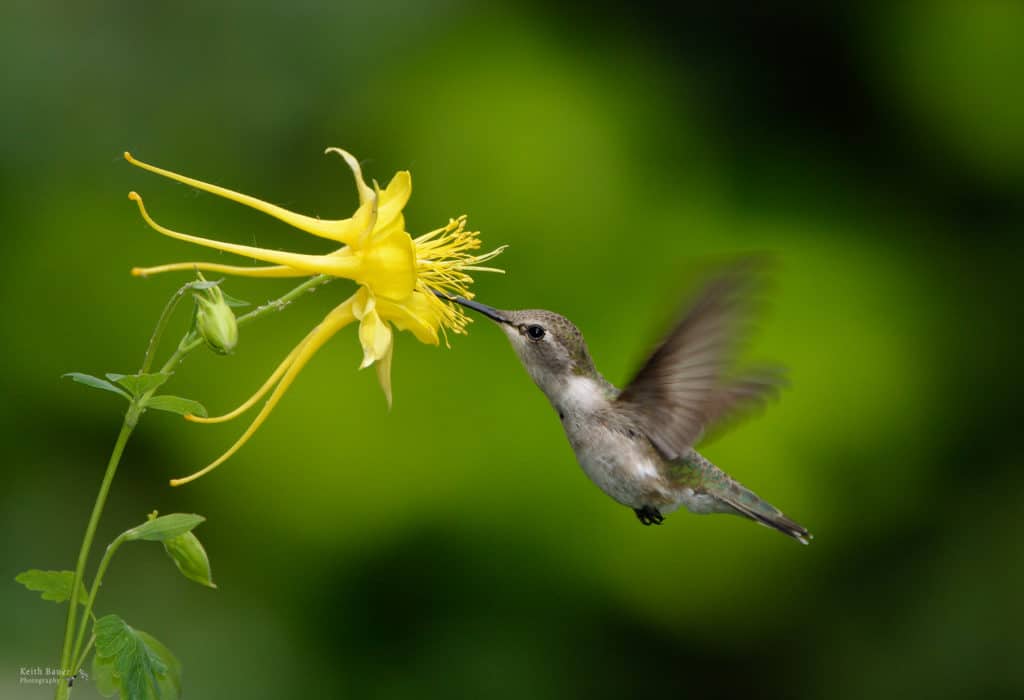
1/500; f/5.6; ISO 200; 700mm
Set up your camera on a tripod, focus on the flower and be ready. You can opt to use a single flash, on camera or off, and wait. You will need to be patient. I like to use a wireless remote for the camera so I can be further away from the camera and less intrusive for the hummer to feel comfortable coming to the flower.
The background for this image is ivy growing on a lattice in my back yard. The lighter green is the new growth, while the darker green is the old growth. The background and placement of the flower was selected with clear intention to have the hummer feed with a nice patch of lighter green that mimics the shape of the hovering hummingbird.
1/500; f/6.3; ISO 1000; 600mm
Camera on tripod; Pre-focused on flower and waited…waited…waited…until the hummingbird came to the flower
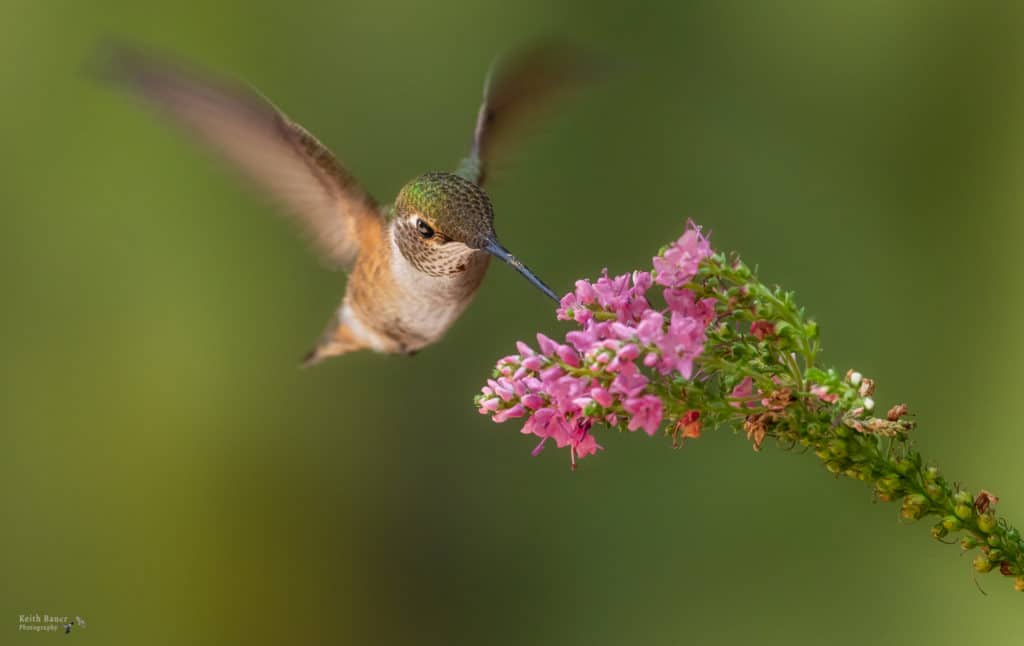
1/500; f/6.3; ISO 1000; 600mm
Camera on tripod; Pre-focused on flower
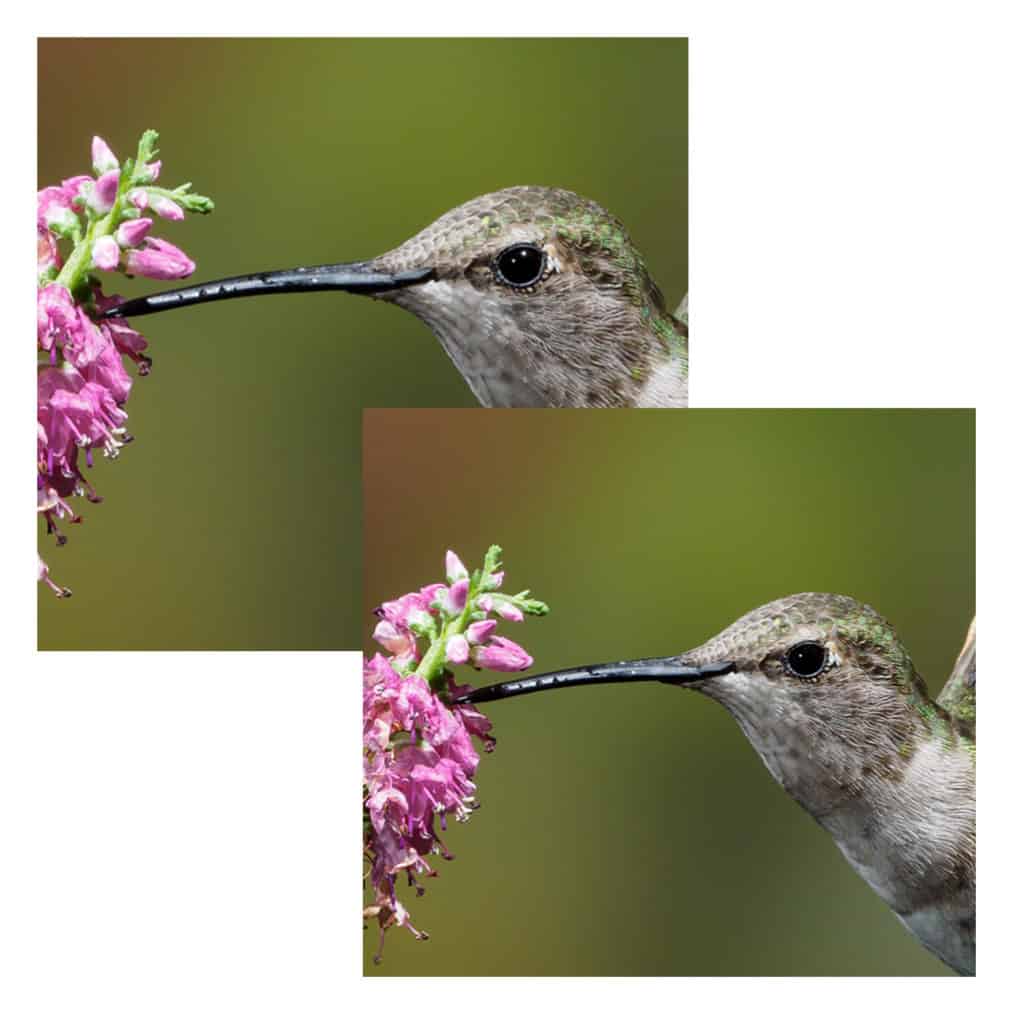
The two images above are the same flower on the same day. Notice the difference in the amount of blur in the wings, despite the same shutter speed. The wing position that you capture will affect the amount of blur that you’ll capture in the wings. A fun fact: hummingbirds do not just flap their wings, they rotate them in a figure 8. This also allows them to fly backwards and hover for longer durations in a stationary location. Their tail movements and tail feathers aid in their ability to hover.
Multi-Flash Hummingbird Photography
Let’s move now to the most equipment intensive option I use to photograph hummingbirds. Setting up an outdoor portrait studio for our little subjects is very much like setting up a portrait studio for people. I’m sure most of you have been in a photographic studio for formal portraits and the photographer was concerned about several things: Background, Lighting, Subjects and Pose.
With multi-flash hummingbird photography, the same is true except that we don’t have full control over the pose, although we do have some.
First let’s talk about flash and its’ use in avian and wildlife photography. I have been asked more than once about the safety of using flash on hummingbirds.
There have been many articles written about the topic, but the most definitive I’ve read is from Dr. Dennis Oliver, DVM and Dr. Donald Cohen, ophthalmologist.
Here’s a link to their article:
Flash and the Visual System of Birds and Animals
This article is not intended to be a forum for any debate on the topic as I believe the content of the referenced article and through years of experience know that the proper use of flash is not detrimental to our little subjects.
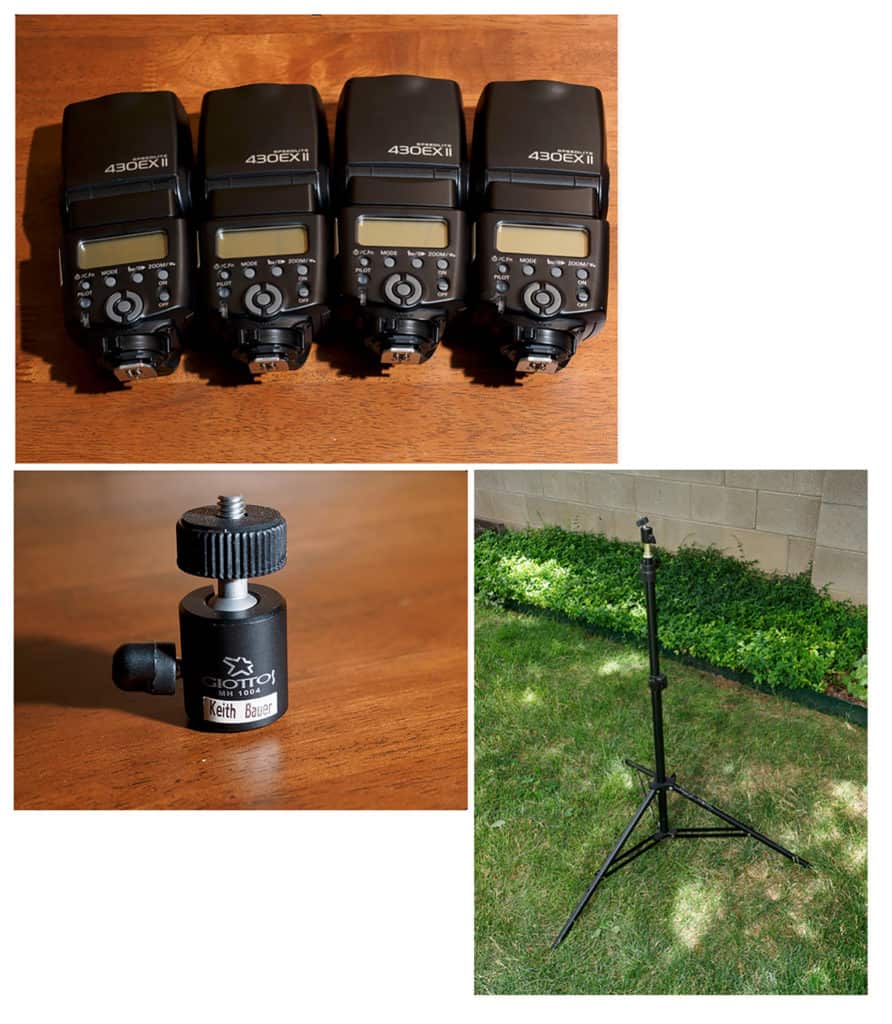
Equipment list for my multi-flash hummingbird “studio”:
- 4 flash units (I use Canon 430 EX II flashes)
- Light Stands – 6
- 4 for the flashes
- 1 for the feeder / flower
- 1 for the background
- Mini ball heads – 4
- 1 for each stand with a flash to enable pointing the flash
- Wireless Radio communication between the camera and the flashes
- I use Vello Radio receivers (4) and a Vello Radio transmitter
- Many systems today have built in radio communications so there would be no need for radio receivers and transmitters. A good example, that is very affordable is the Godox line of flashes
- Backgrounds (I use out of focus prints of plants/shrubs/flowers/foliage)
- Wireless shutter release for your camera
- Wimberly Plamp
Here are a few pictures of my equipment
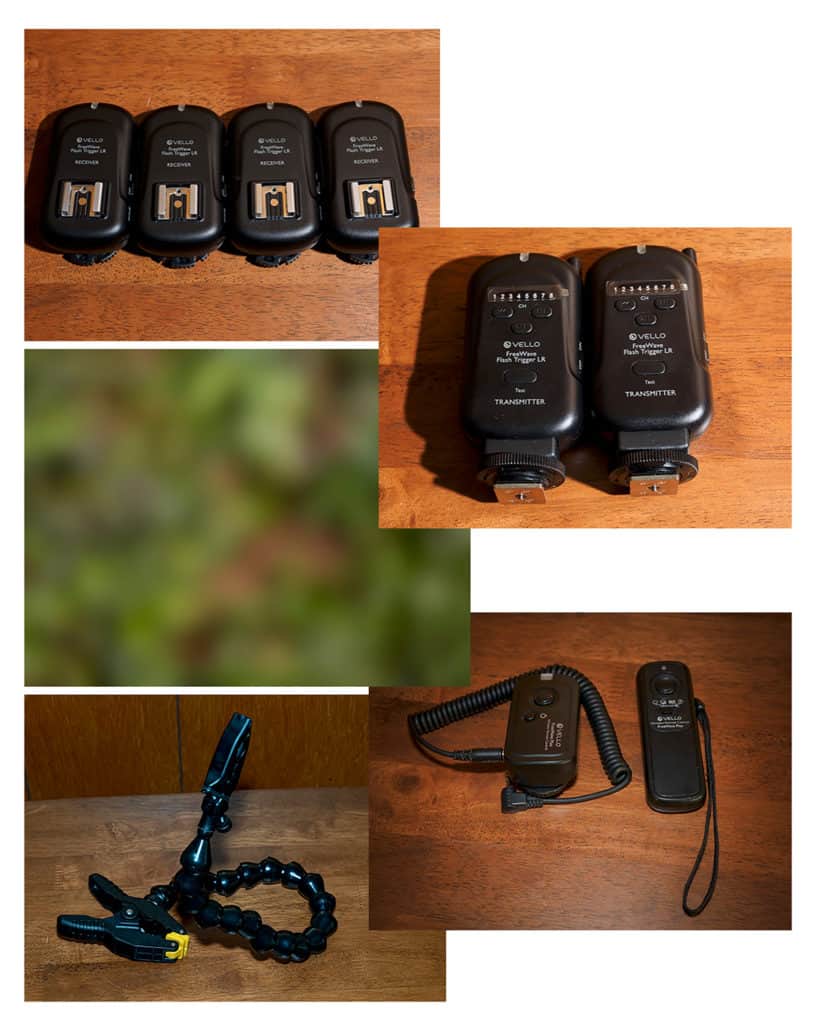
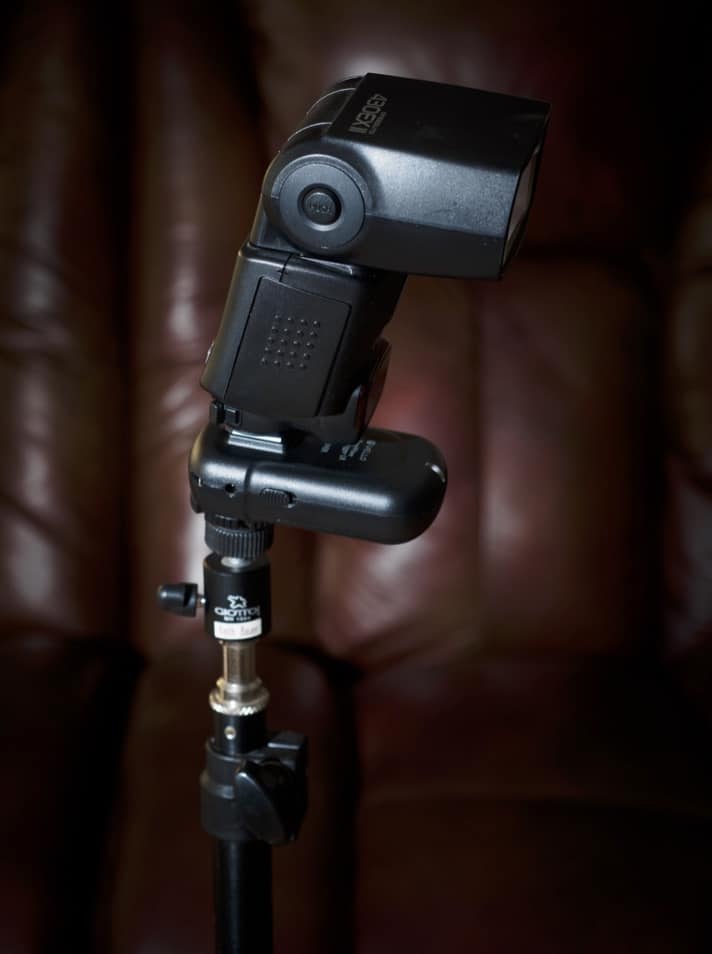
If you have flashes with built-in wireless, you would just mount the flash directly to the mini-ballhead using the supplied foot/stand that came with the flash.
What Can Be Achieved With A Mult-Flash Setup?
- Creating images where you can see their wings stopped
- Having some control over their pose
- Having sufficient DOF without pushing the ISO of your camera
Stopped wings: I like to be able to see the different wing positions and be able to stop that action. I’m fully aware that others think that images with the wings stopped feel “unnatural” because we can’t see it with just our eyes. Photography allows us to capture all kinds of things we can’t see with our own eyes, so I don’t ascribe to that objection. I like to take images of moving water with slow shutter speeds to capture that silky water look that I can’t see with my own eyes, or take pictures of the Milky Way to create images I can’t see with my own eyes, or take black and white images which are not visible with our eyes. There are many more examples of things we can capture with camera systems that we can’t see on our own.
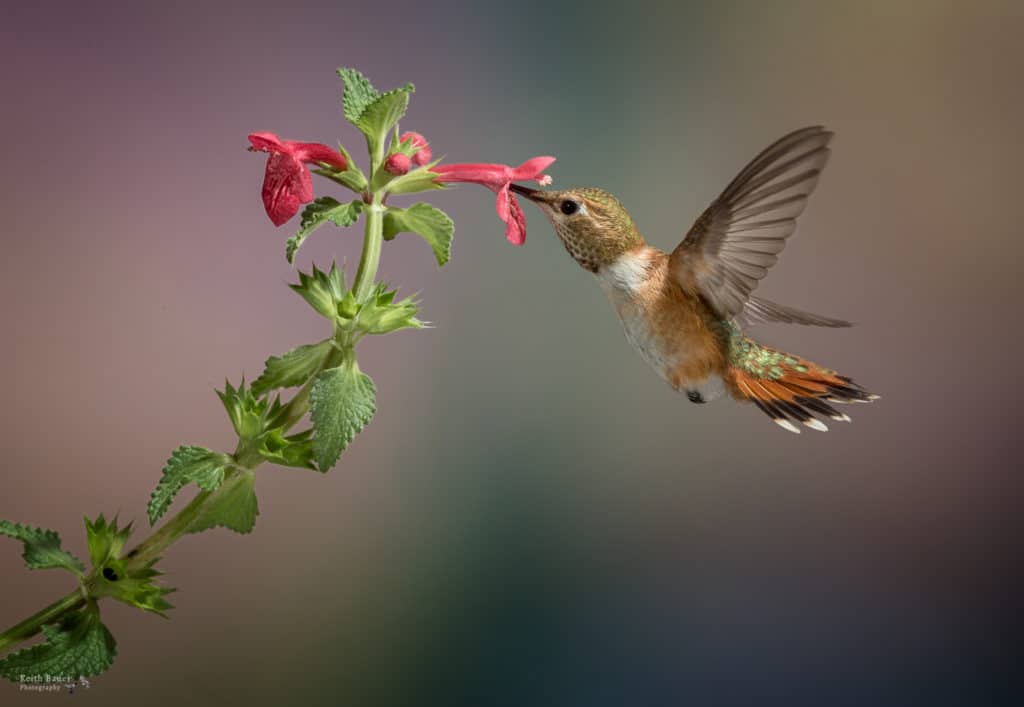
Having some control over their pose: “Some” is the operative word here. By positioning a flower in a particular way, and knowing that hummers like to feed on that flower, you have the ability to control a bit of the angle the hummingbird might come to your flower. Some flowers will allow you to put a drop or two of nectar in the flower to help coax the hummingbird to your desired location. Other flowers just don’t lend themselves to this option and you just have to be patient and wait. In this example putting nectar in the flower is pointless as it just runs out of the flower.
By choosing a flower stem with the open flowers facing down, I knew the hummingbird would want to put its’ beak in one of the open buds and come into the scene from the bottom of the frame. The more vertical pose was the desired outcome. The exact pose and wing position is not under our control, but at least I had some small control to create the image I was after.
How Does This Setup Really Work?
Typical camera settings for this kind of work are:
- Shutter speed: 1/200 or 1/250 (use the fastest sync speed your camera supports)
- Special Note: For most mirrorless camera systems today, you should use the mechanical shutter, not the electronic shutter. The sync speeds for electronic shutter are slower than the mechanical sync speed – this is true as of the writing of this article.
- Aperture: f/16
- ISO: 200
With that shutter speed, you of course ask how can the wings be stopped? The camera settings used as noted above will create a completely black frame, i.e. no ambient light will be contributed to the overall exposure. That means that the only light that contributes to the exposure is from the flashes. My outdoor “studio” for these images is alway in the shade, never direct bright sunlight. Nice overcast days are even better.
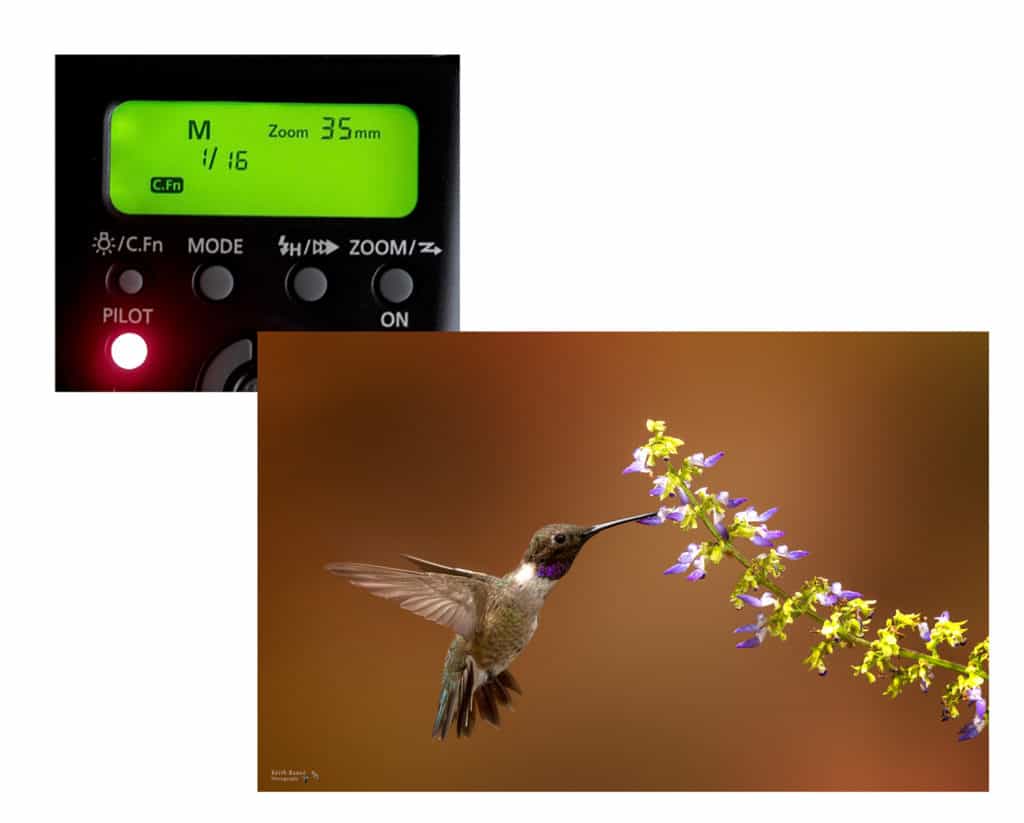
Flash settings:
All of the flashes are set in manual mode at 1/16 power. With the flashes that I use, the duration of the burst of light from the flash is about 1/15000 of a second. That duration becomes the effective shutter speed since no ambient light is contributing to the exposure. That explains how we’re able to stop the motion of the wings.
The flashes need to be in Manual Mode, NOT TTL mode. TTL mode would allow the flash to alter the amount of light it puts out based on the subject distance and more importantly, it changes the duration of the pulse of light from the flash. You simply can’t get consistent results with flashes in TTL Mode.
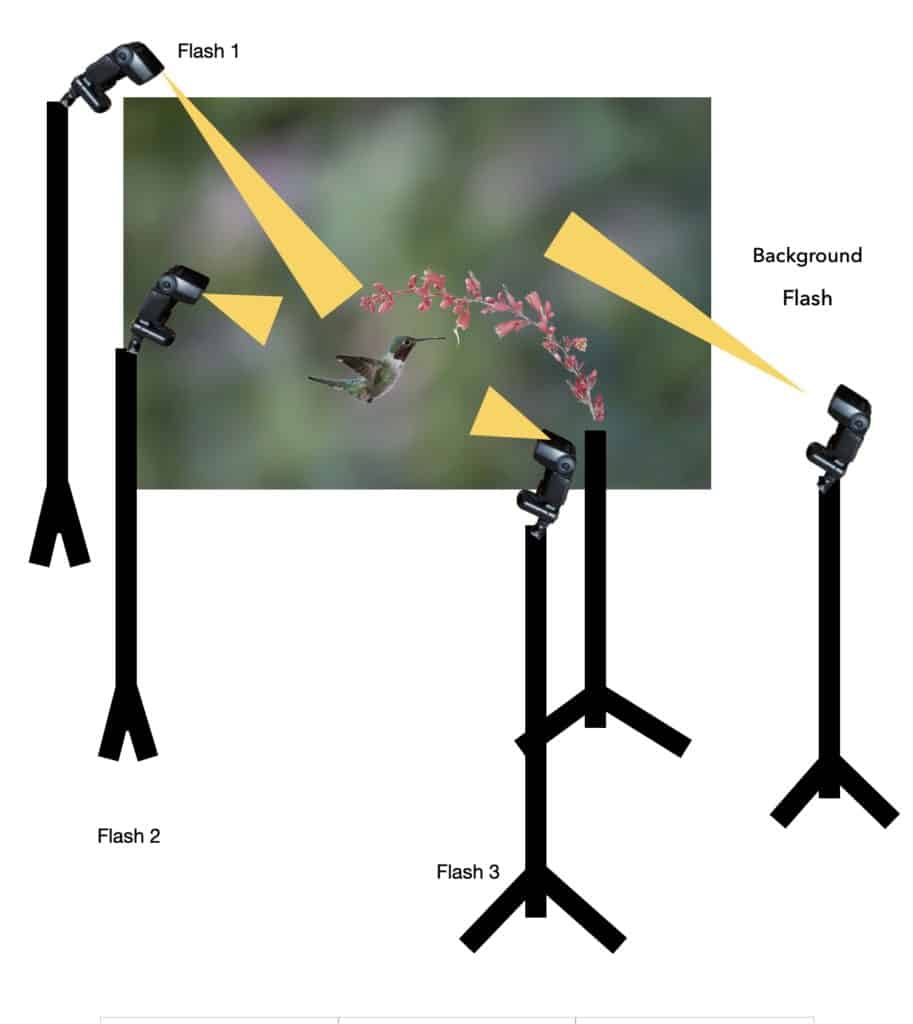
On the following page I have a rough diagram showing a typical flash setup for my multi-flash hummingbird images. Here is a brief description to help visualize the intent and placement of the flashes. Please note that this is only one of many, many ways you can arrange the flashes. There is not a singular correct answer. Experiment to get the lighting quality and lighting ratios that you desire.
Background flash: The flash is placed so that it can only throw light onto the background. That is usually about 5 feet back from the flower where I hope to photograph the hummingbird
Flash 1: It is placed high and pointed down toward the hummingbird location to create a light source that would mimic the sun.
Flash 2: It is also placed higher than the hummingbird and usually more in front of the flower location. Again, a light source from the top to create light that would mimic the sun. Vary the distance from Flash 1 and Flash 2 from the subject.
Flash 3 : This flash is usually a little lower than the flower and pointed up a small amount toward the planned location for the hummingbird. This is intended as a soft fill flash to soften shadows created by Flash 1 and Flash 2. It is NOT intended to remove the shadows, just soften them.
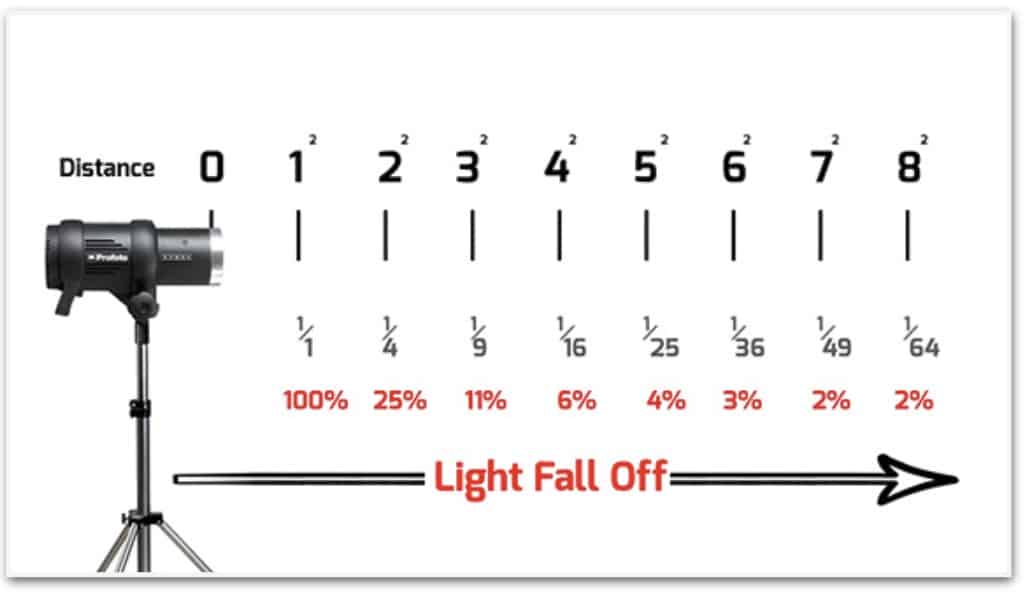
Controlling the lighting ratios: Since the flashes are all in manual power, the way that you control the amount of light that each flash will contribute to the overall exposure is by setting them at varying distances from the subject. The inverse squares law determines how to figure out relative distances to achieve the desired lighting. The basic principal is simple: as you move the flash further away from the subject the intensity of light will decrease. The question is by how much? The inverse squares law says: If you have a point source of light at a distance of X from a subject, and you move that point source so that it is twice as far away, the intensity of the light will fall to 1/4 of the original amount of light. Whew…. that’s a mouthful. In other words to reduce the amount of light from a flash, move it further away. If you double the distance, the amount of light it will contribute is reduced to 1/4. Here’s a little chart that shows the amount of light fall off based on relative distances.
The goal is have a lighting setup that creates a completely natural look with shadowing where you would expect, and not have hot spots or overly dark shadows. You also do not want completely even lighting from top to bottom as that is not what the sun would produce in a natural setting.
There is nothing magical about using 4 flashes. That is just the number that allows me to create the light that I want. It is certainly possible to work with only 3 flashes, 2 on the hummingbird, and 1 for the background. Using only 2 flashes is not a recipe for success to create natural lighting and provide the flexibility needed. I’ve seen hummingbird photographers work with as many as 7 flashes. I think all that does is create increased complexity trying to achieve lighting ratios and also tends to create a flat lighting scheme with no shadows that does not look nice or natural.
To summarize using a multi-flash setup:
- Create your outdoor portrait studio in a nice shady location
- Find a flower that is natural for hummingbirds in your locale
- Set up your flashes to create the look you want
- Sit back and BE PATIENT
- When a hummingbird does come to your flower
- Start taking images
- You cake about 1-2 images per second
- The flashes at 1/16 power recycle very quickly
- If the hummingbird hangs around on the flower continue shooting because you can’t predict, or see the wing position that you’ll capture. My experience is that once the hummers are comfortable with your flower, they will stay for a while, up to 30 seconds is not uncommon.
- You should have your camera set to capture one frame for each press of the shutter button. Do NOT have it set on continuous burst frame rates as that is a great way to overheat, or burn up your flashes.
Post Processing:
Since you are in complete control of the lighting and composition, there is generally very little post processing needed to finish the images. The only exception is if your lighting scheme creates more than one catchlight in the hummingbirds eye. You would want to remove additional catchlights as sun light would only create one.
Patience:
Patience is a critical part of success in hummingbird photography. Obviously you have no control over getting the hummingbirds to come to your location and finally arrive at your flower for their portrait. Then once they do come, you will find that you capture images with wing positions that are just not very attractive. Sit back, relax and enjoy the moments. The images will eventually come and when they do, you’ll be gratified with some wonderful images of these marvelous little birds.
I have a gallery dedicated to hummingbirds on my website at the following link if you’d like to see more of the hummingbird work I’ve done over the years. There are also a couple of slow motion and standard motion videos in that gallery.